# URL ## Set your site url here. For example, if you use GitHub Page, set url as 'https://username.github.io/project' url: http://techniquenotes.github.io permalink: :year/:month/:day/:title/ permalink_defaults: pretty_urls: trailing_index: true # Set to false to remove trailing 'index.html' from permalinks trailing_html: true # Set to false to remove trailing '.html' from permalinks
post_meta: page: date_type: both # created or updated or both 主页文章日期是创建日或者更新日期或都显示 date_format: data # date/relative 绝对日期还是相对日期 categories: true # true or false 主页是否显示分类 tags: true # true or false 主页是否显示标签 label: true # true or false 显示描述性文字 post: date_type: both # created or updated or both 文章页日期是创建日或者更新日期或都显示 date_format: data # date/relative 绝对日期還是相对日期 categories: true # true or false 文章页是否显示分类 tags: true # true or false 文章页是否显示标签 label: true # true or false 显示描述性文字
复制相关配置
可配置网站是否可以复制、复制的內容是否添加版权信息
1 2 3 4 5 6 7
# copy settings # copyright: Add the copyright information after copied content(複製的內容後面加上版權信息) copy: enable: true//是否开放网站复制权限 copyright: //复制的内容后面加上版权信息 enable: true//是否开放复制版权信息添加 limit_count: 50//字数限制,当复制文字大于这个字数限制时,将在复制内容后加上版权信息
toc: post: true//文章页是否显示TOC page: true//普通页面是否显示TOC number: true//是否显示章节数 expand: false//是否展开TOC style_simple: false # for post //简洁模式,侧边栏只显示TOC,只对文章页有效 scroll_percent: true//是否显示滚动进度百分比
相关文章
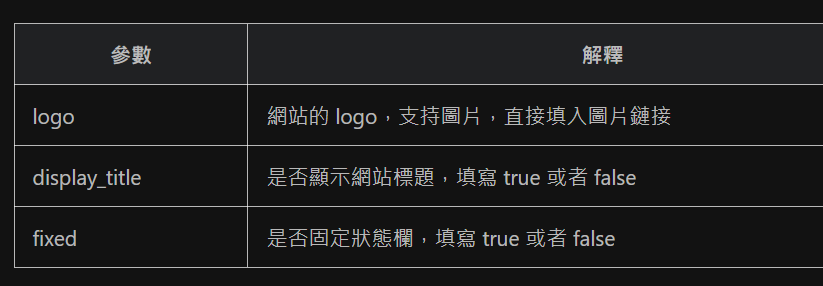
修改主题配置文件
1 2 3 4
related_post: enable: true limit: 6 # 顯示推薦文章數目 date_type: created # or created or updated 文章日期顯示創建日或者更新日
文章过期提醒
可设置是否显示文章过期提醒,以更新时间为基准。
1
2
3
4
5
6
7
8
# Displays outdated notice for a post (文章過期提醒) noticeOutdate: enable: true style: flat # style: simple/flat limit_day: 365 # When will it be shown position: top # position: top/bottom message_prev: It has been message_next: days since the last update, the content of the article may be outdated.
文章分页按钮
1 2 3 4 5 6
# post_pagination (分頁) # value: 1 || 2 || false # 1: The 'next post' will link to old post # 2: The 'next post' will link to newpost # false: disable pagination post_pagination: 2
博客年份和页脚自定义文本
修改主题配置文件
1 2 3 4 5 6
footer:
  owner:
    enable: true
    since: 2023
  custom_text: Hi, welcome to my <a href="https://techniquenotes.github.io">blog</a>!
  copyright: true # Copyright of theme and framework