PyTorch深度学习快速入门教程
1 PyTorch 环境配置
Anaconda 安装
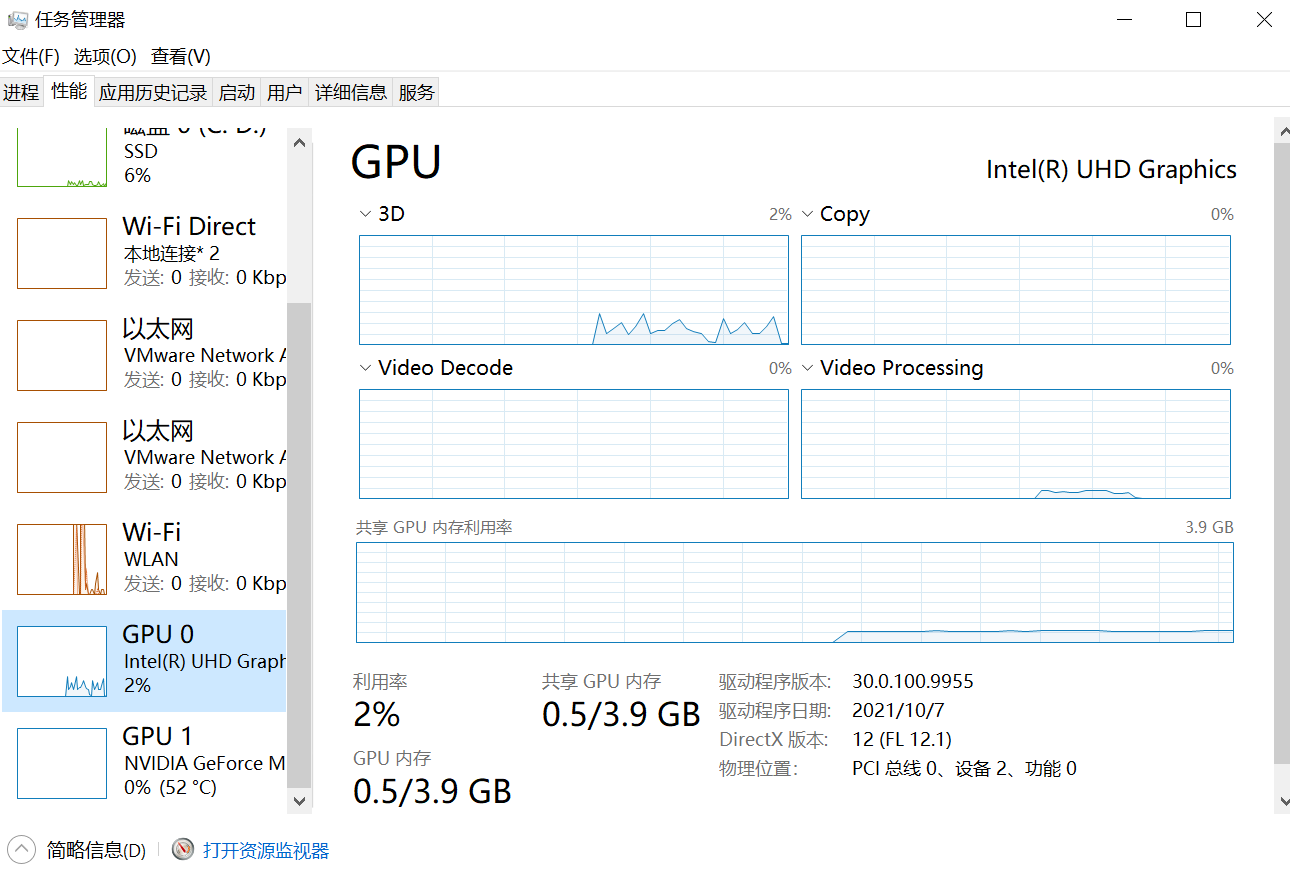
显卡配置(驱动+CUDA Toolkit)
![image-20230718205108412](https://cdn.jsdelivr.net/gh/techniquenotes/photohouse@main/Pytorch/Learning%20note/Day1202307201237544.png)
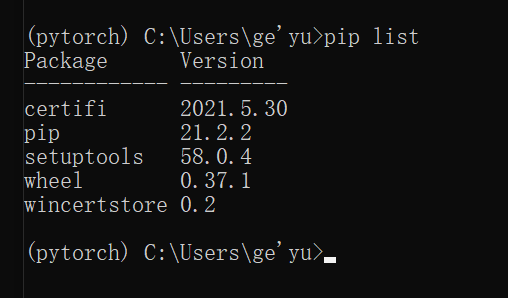
有序地管理环境
初始环境:base
切换环境使用不同的pytorch版本
1 |
|
![image-20230718210634806](https://cdn.jsdelivr.net/gh/techniquenotes/photohouse@main/Pytorch/Learning%20note/Day1202307201238878.png)
1 |
|
![image-20230718210727247](https://cdn.jsdelivr.net/gh/techniquenotes/photohouse@main/Pytorch/Learning%20note/Day1202307201238876.png)
Pytorch安装
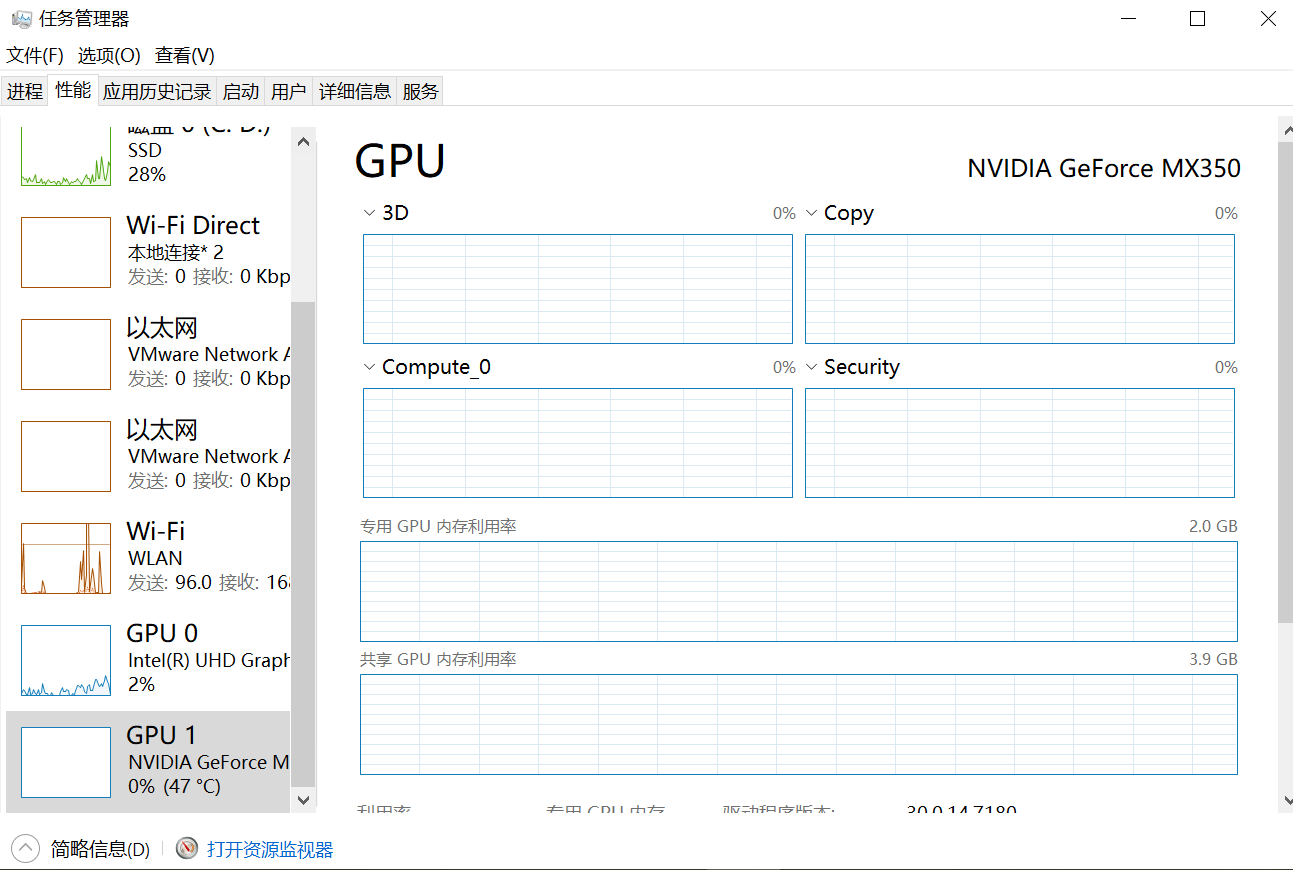
任务管理器查看是否有英伟达显卡
![image-20230718212126175](https://cdn.jsdelivr.net/gh/techniquenotes/photohouse@main/Pytorch/Learning%20note/Day1202307201238020.png)
CUDA推荐使用9.2
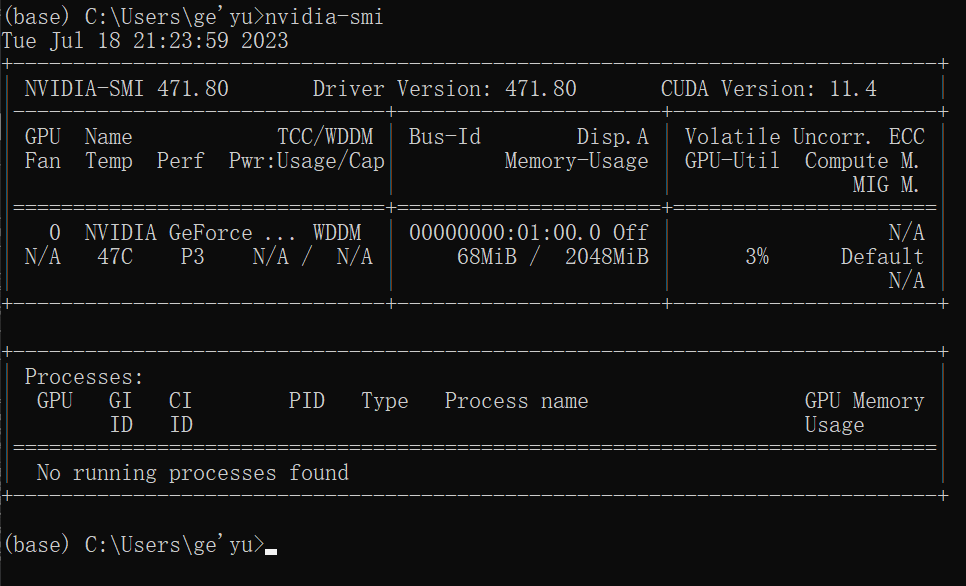
查看驱动版本
![image-20230718212421748](https://cdn.jsdelivr.net/gh/techniquenotes/photohouse@main/Pytorch/Learning%20note/Day1202307201238219.png)
大于396.26可使用
pytorch环境下输入命令,安装9.2版本
1 |
|
报错,因为下载速度太慢
清华源可以下载cpu版本:https://blog.csdn.net/zzq060143/article/details/88042075
如果找不到源,需要把命令中的 https 改成 http
下载gpu版本教程:https://www.bilibili.com/read/cv15186754
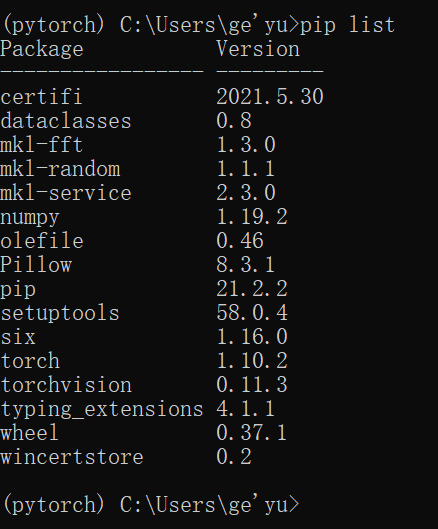
![image-20230718233907433](https://cdn.jsdelivr.net/gh/techniquenotes/photohouse@main/Pytorch/Learning%20note/Day1202307201238461.png)
返回时False,因为装的是cpu版本,gpu版本才返回true。cpu版本学习阶段可以使用。
2 Python编辑器的选择
Pytorch安装
官网:https://www.jetbrains.com/pycharm/
下载Community版本
Pytorch 配置
create new project
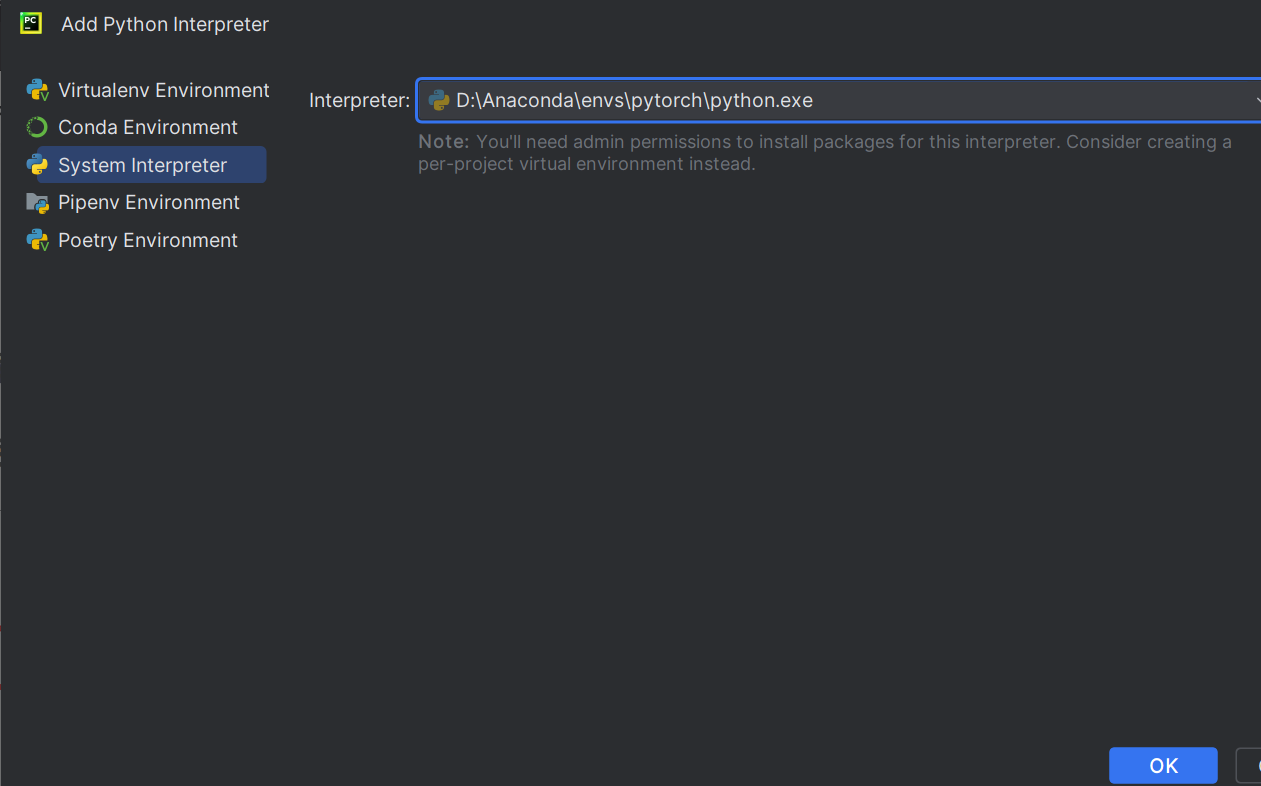
需要自己配置解释器
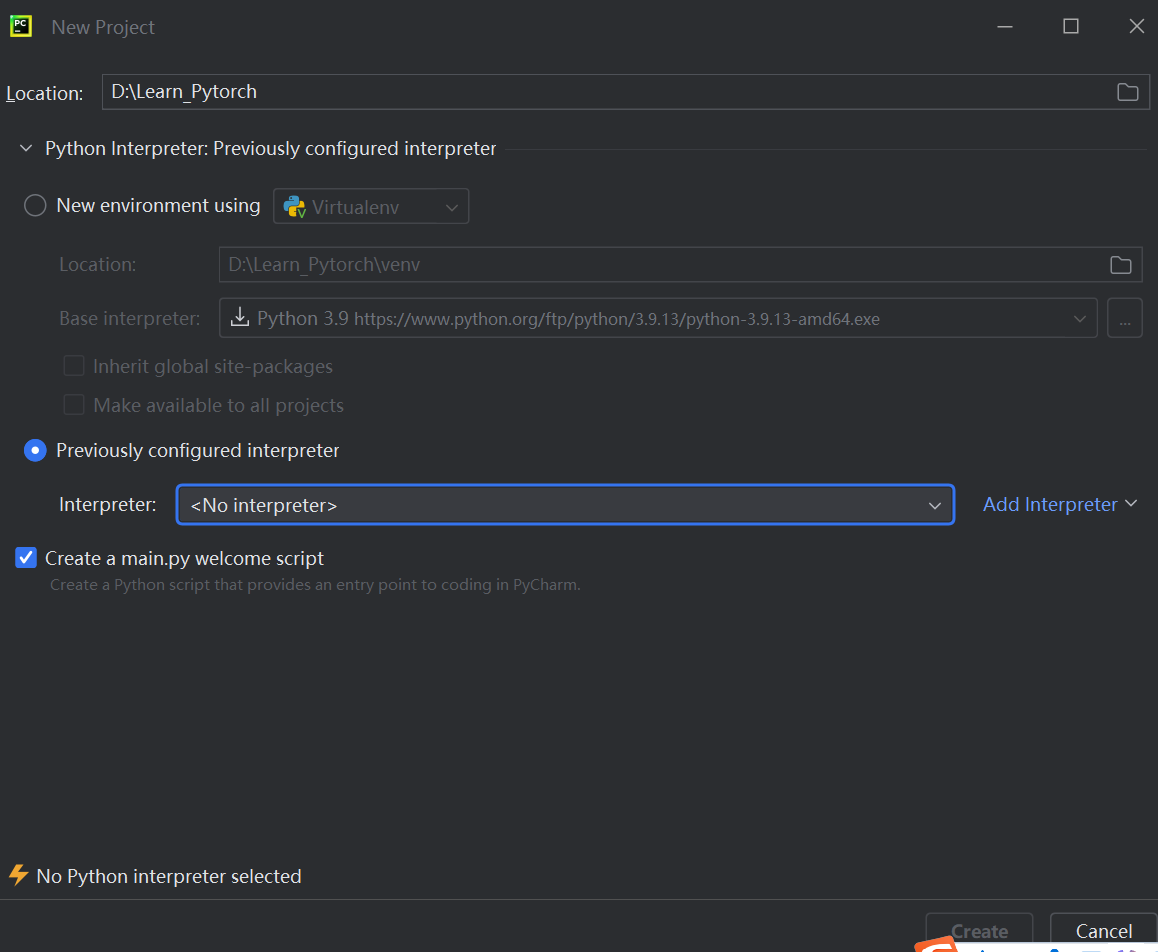
![image-20230719100104852](https://cdn.jsdelivr.net/gh/techniquenotes/photohouse@main/Pytorch/Learning%20note/Day1202307201238045.png)
添加python.exe
![image-20230719103201967](https://cdn.jsdelivr.net/gh/techniquenotes/photohouse@main/Pytorch/Learning%20note/Day1202307201238038.png)
Conda Environment可能找不到python.exe,选择System Environment添加
https://blog.csdn.net/weixin_43537097/article/details/130931535
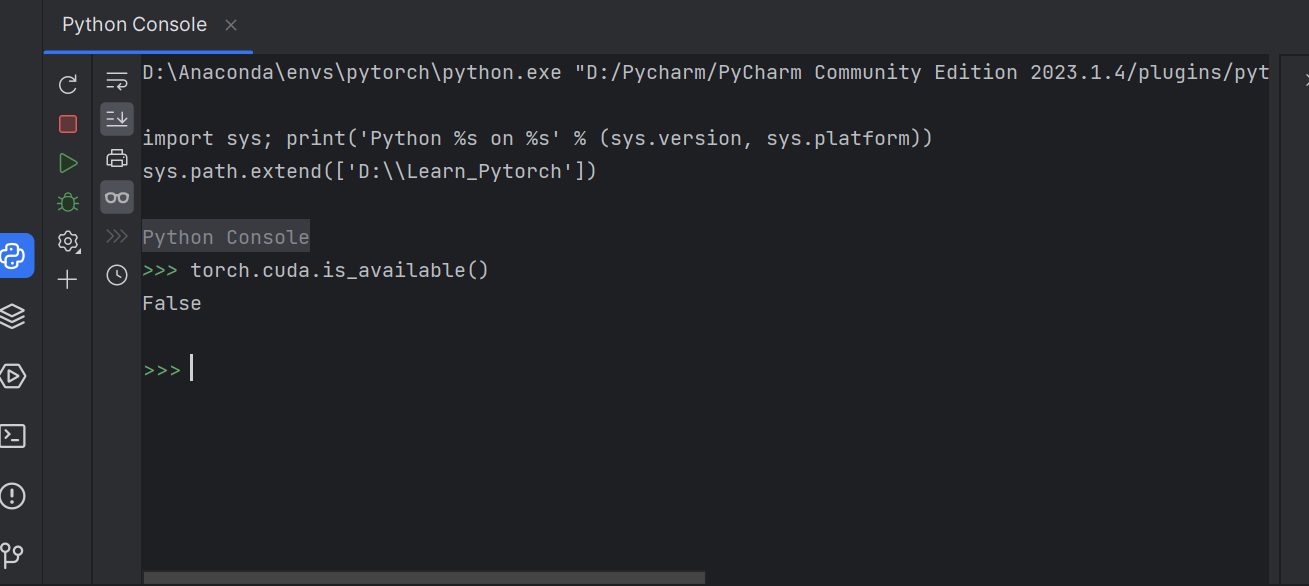
打开Python Consle
import torch
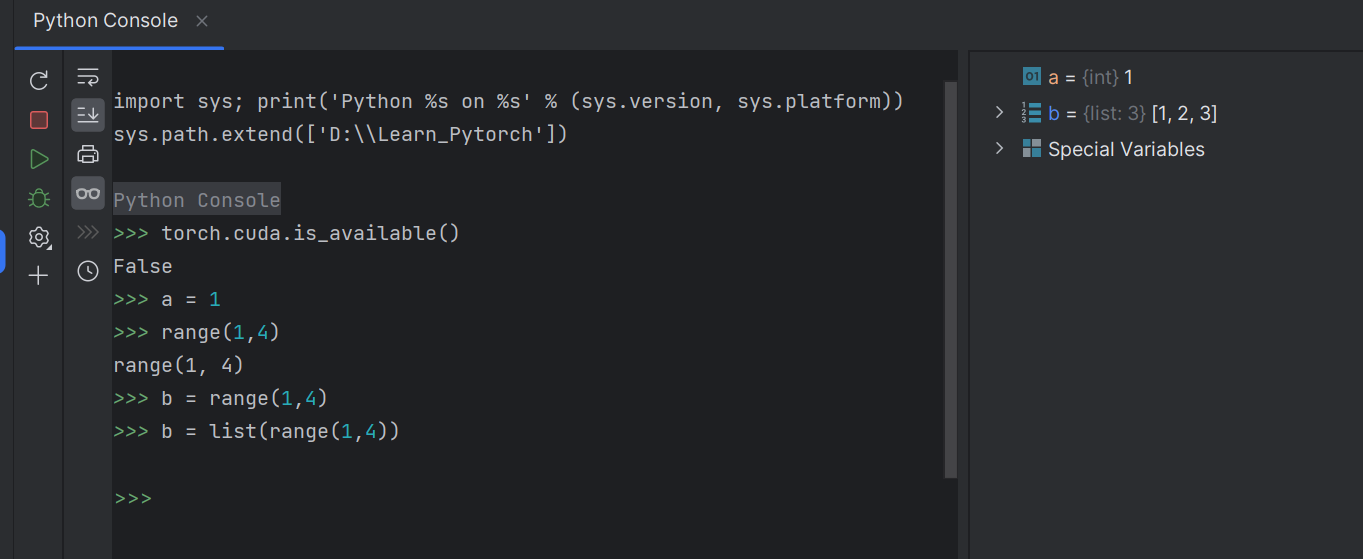
输入torch.cuda.is_available(),CPU版本返回false
![image-20230719103754349](https://cdn.jsdelivr.net/gh/techniquenotes/photohouse@main/Pytorch/Learning%20note/Day1202307201239602.png)
右侧工具栏可实时查看变量
![image-20230719104030691](https://cdn.jsdelivr.net/gh/techniquenotes/photohouse@main/Pytorch/Learning%20note/Day1202307201239825.png)
Jupyter 安装
在Pytorch环境中安装Jupyter
在pytorch环境中安装一个包
![image-20230719131043395](https://cdn.jsdelivr.net/gh/techniquenotes/photohouse@main/Pytorch/Learning%20note/Day1202307201239084.png)
运行Jupyter
![image-20230719131433335](https://cdn.jsdelivr.net/gh/techniquenotes/photohouse@main/Pytorch/Learning%20note/Day1202307201239811.png)
创建代码
![image-20230719131509833](https://cdn.jsdelivr.net/gh/techniquenotes/photohouse@main/Pytorch/Learning%20note/Day1202307201239442.png)
shift + enter运行代码块
![image-20230719131558361](https://cdn.jsdelivr.net/gh/techniquenotes/photohouse@main/Pytorch/Learning%20note/Day1202307201239418.png)
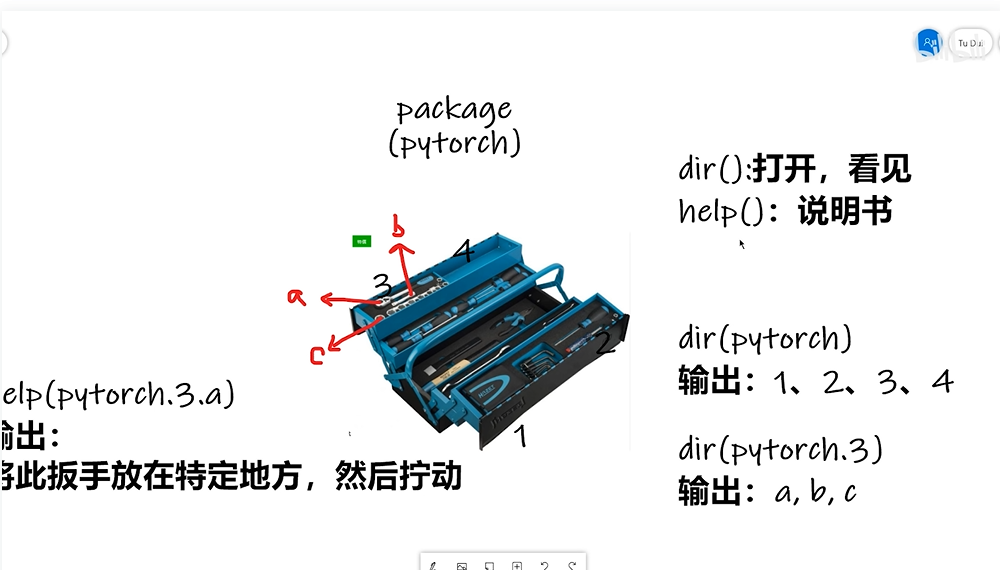
3 Pytorch学习中的两大法宝函数
![image-20230719140047441](https://cdn.jsdelivr.net/gh/techniquenotes/photohouse@main/Pytorch/Learning%20note/Day1202307201254546.png)
总结:
dir()函数,能让我们知道工具箱以及工具箱中的分隔区有什么东西。
help()函数,能让我们知道每个工具是如何使用的,工具的使用方法。
打开Pycharm,测试这两个工具函数
1 |
|
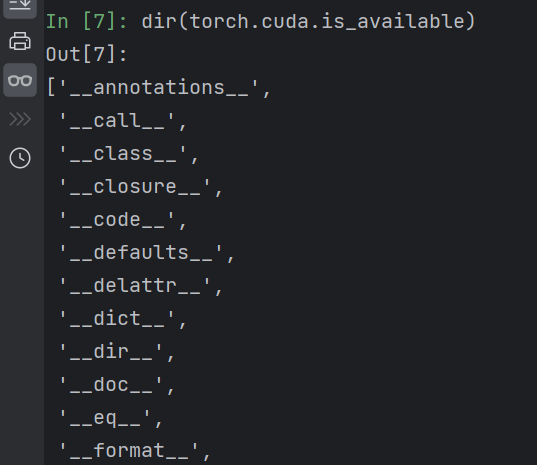
![image-20230719141153933](https://cdn.jsdelivr.net/gh/techniquenotes/photohouse@main/Pytorch/Learning%20note/Day1202307201254923.png)
前后有双下划线,表明变量不能修改,说明是函数,不是分割区
dir和help里面函数后面的括号记得去掉
1 |
|
![image-20230719141419656](https://cdn.jsdelivr.net/gh/techniquenotes/photohouse@main/Pytorch/Learning%20note/Day1202307201254498.png)
4 Pycahrm及Jupyter使用对比
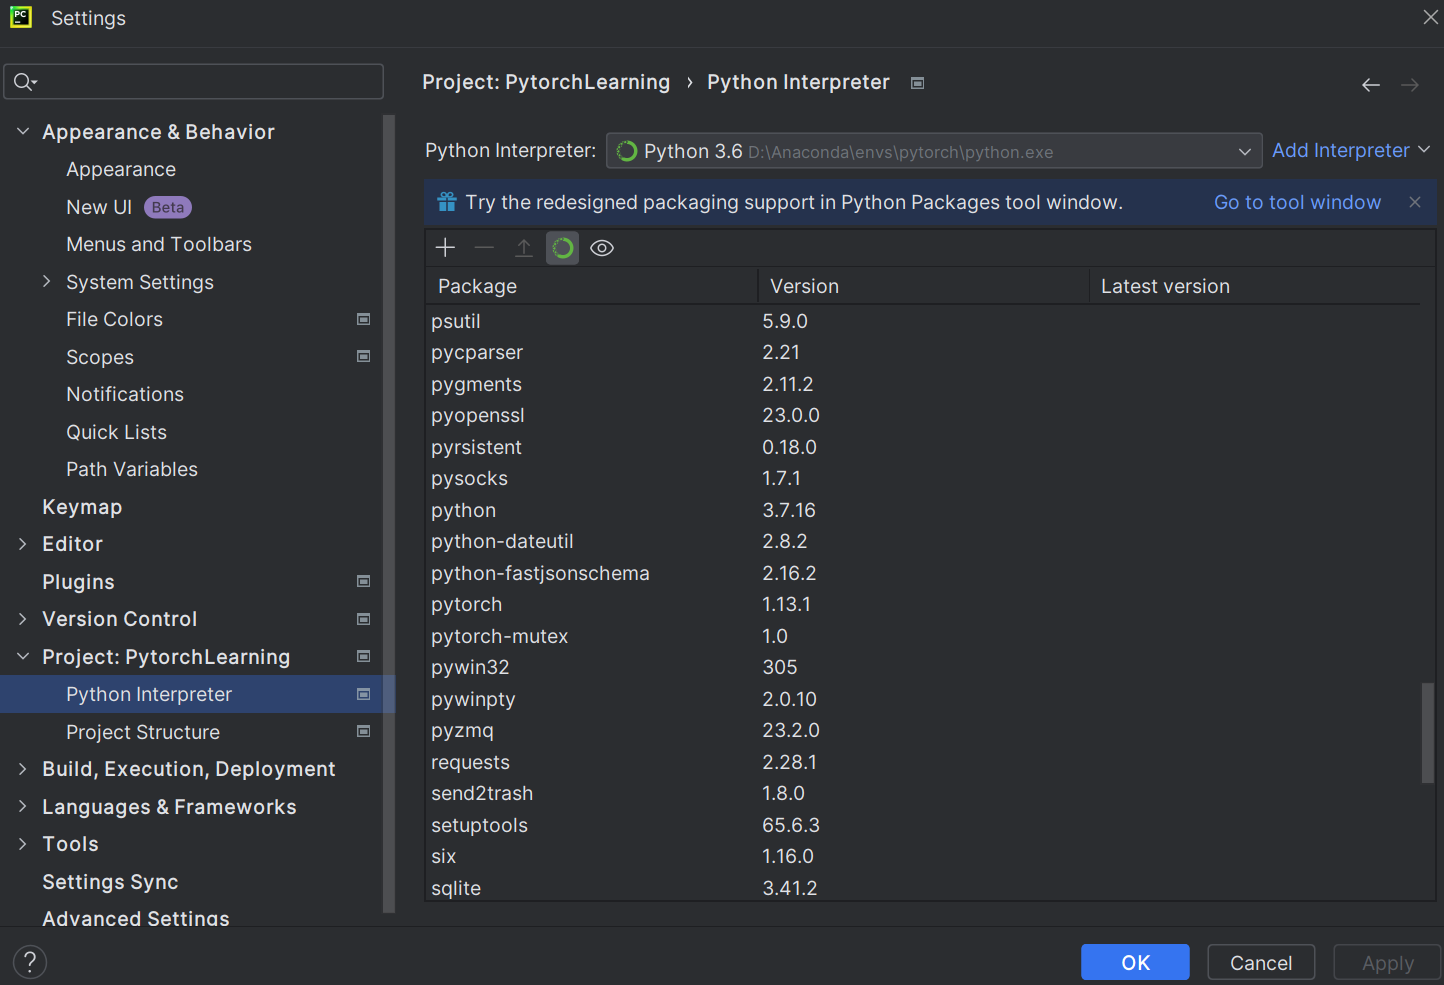
在Pycharm中新建项目
在File-Setting中可查看该项目是否有Pytorch环境
![image-20230719141734242](https://cdn.jsdelivr.net/gh/techniquenotes/photohouse@main/Pytorch/Learning%20note/Day1202307201254410.png)
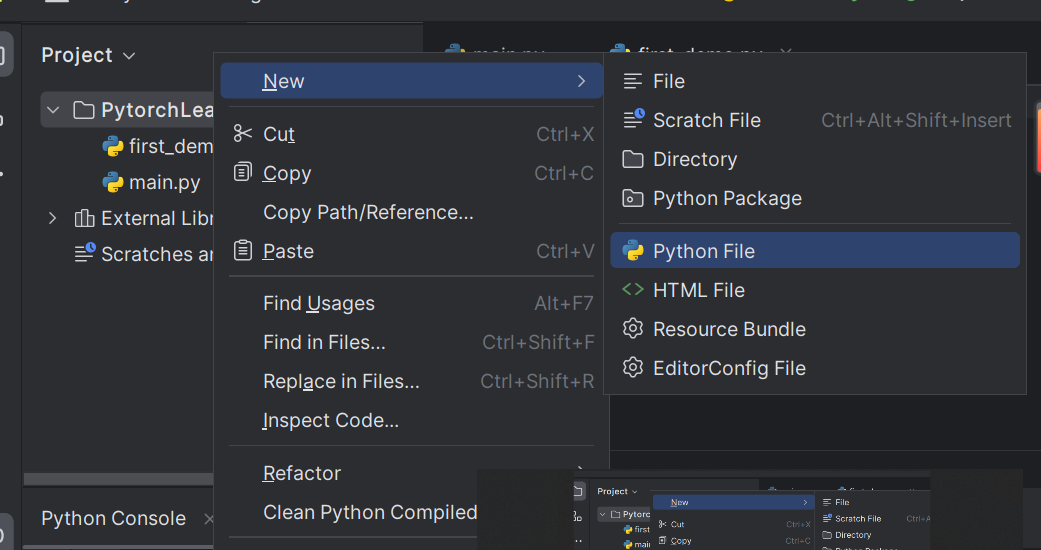
新建Python文件
![image-20230719141855063](https://cdn.jsdelivr.net/gh/techniquenotes/photohouse@main/Pytorch/Learning%20note/Day1202307201254822.png)
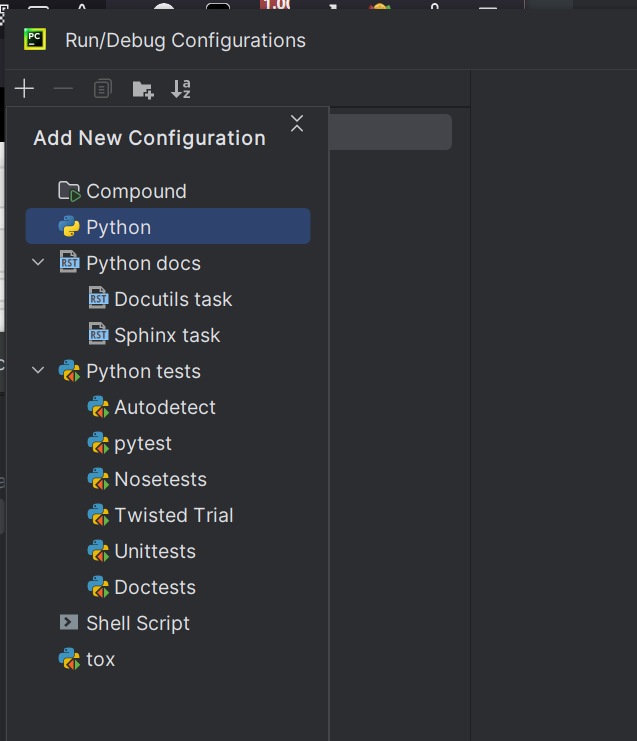
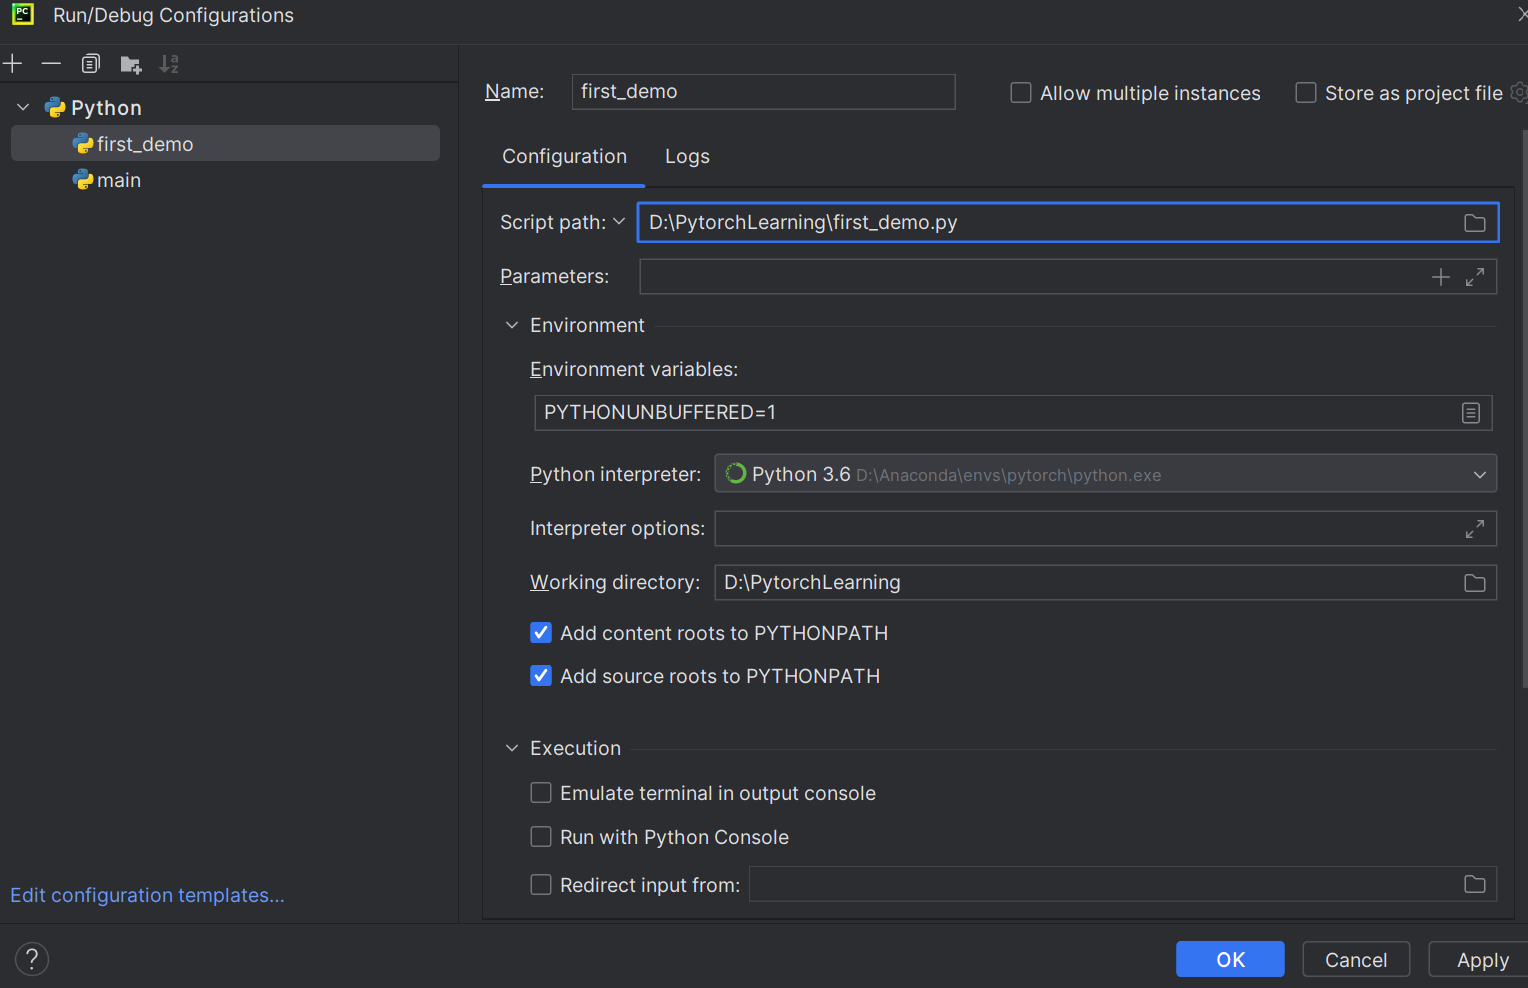
为Python文件设置Python解释器
![image-20230719142138096](https://cdn.jsdelivr.net/gh/techniquenotes/photohouse@main/Pytorch/Learning%20note/Day1202307201255941.png)
![image-20230719142305822](https://cdn.jsdelivr.net/gh/techniquenotes/photohouse@main/Pytorch/Learning%20note/Day1202307201255929.png)
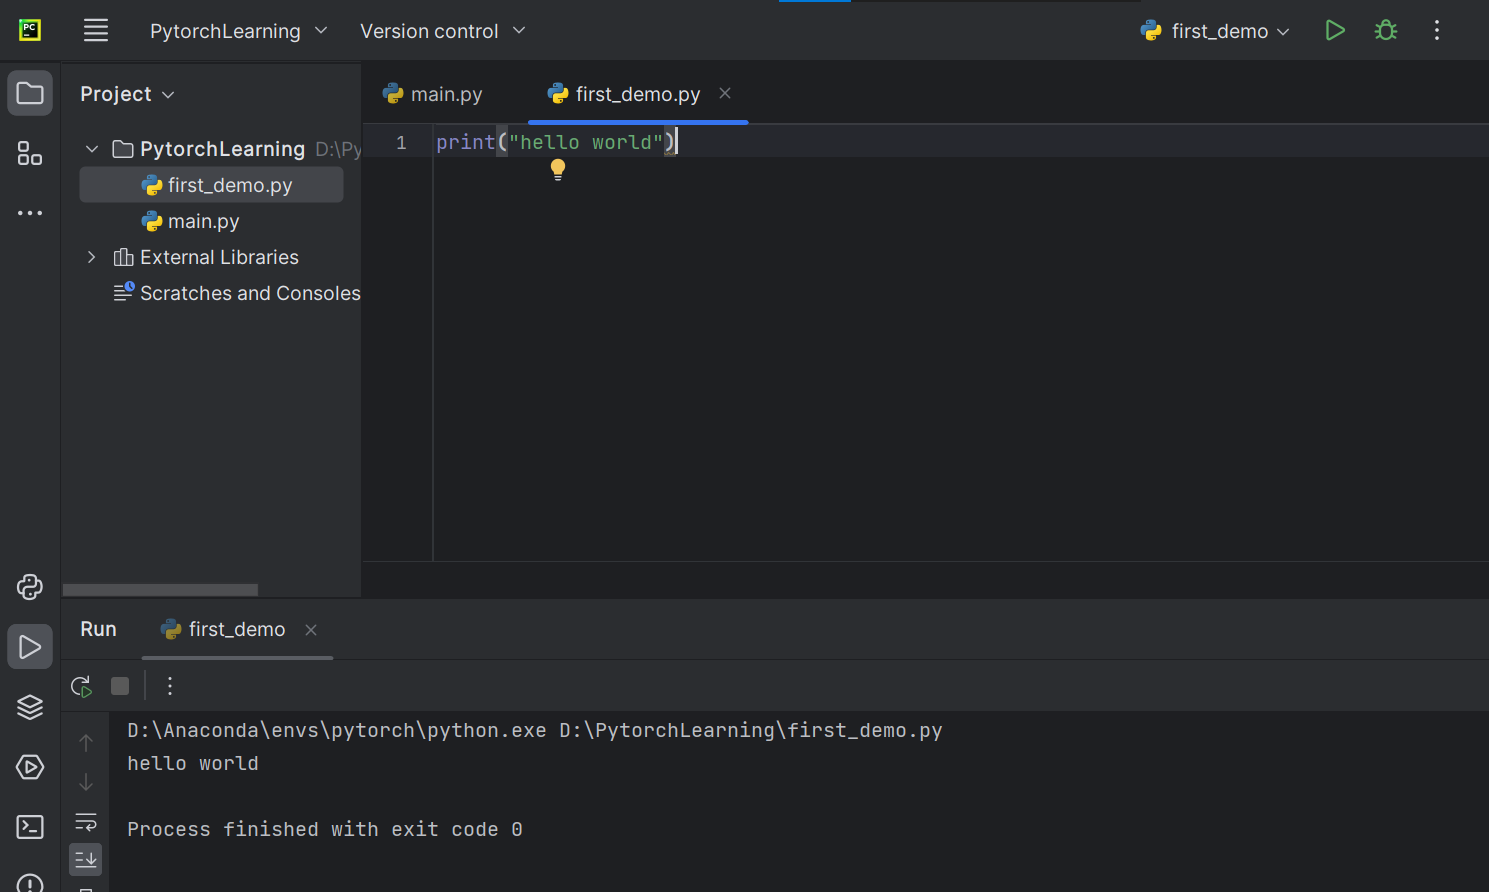
运行成功
![image-20230719142342738](https://cdn.jsdelivr.net/gh/techniquenotes/photohouse@main/Pytorch/Learning%20note/Day1202307201255878.png)
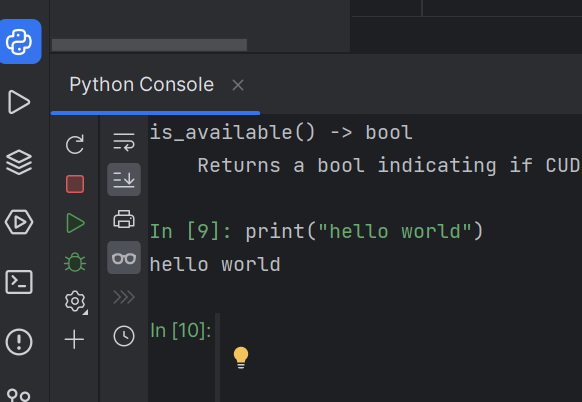
也可以直接在Python控制台输入语句,直接输出结果
![image-20230719142538947](https://cdn.jsdelivr.net/gh/techniquenotes/photohouse@main/Pytorch/Learning%20note/Day1202307201255536.png)
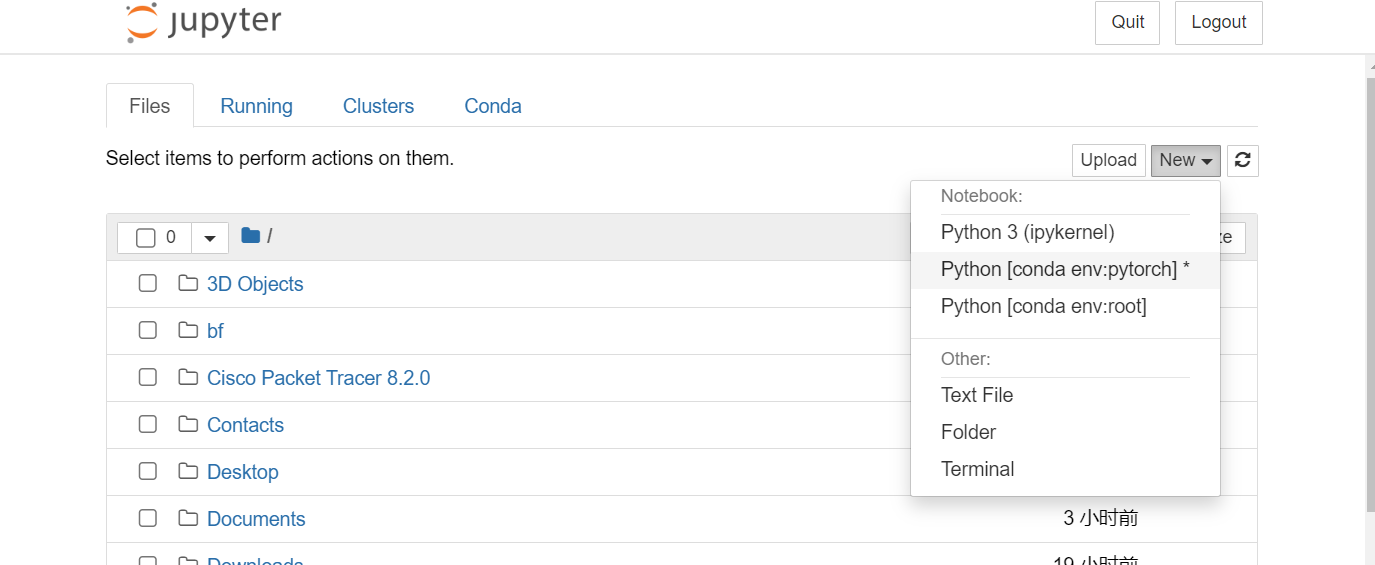
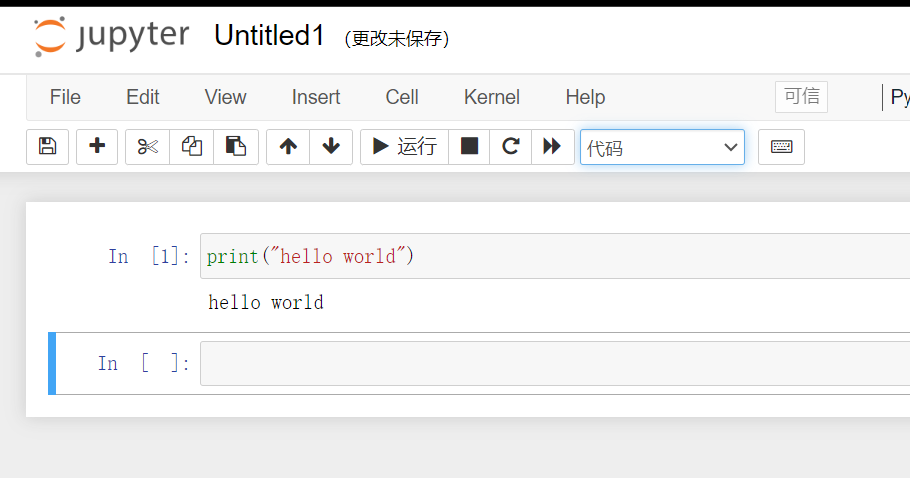
Jupyter新建项目及使用
![image-20230719142709123](https://cdn.jsdelivr.net/gh/techniquenotes/photohouse@main/Pytorch/Learning%20note/Day1202307201255848.png)
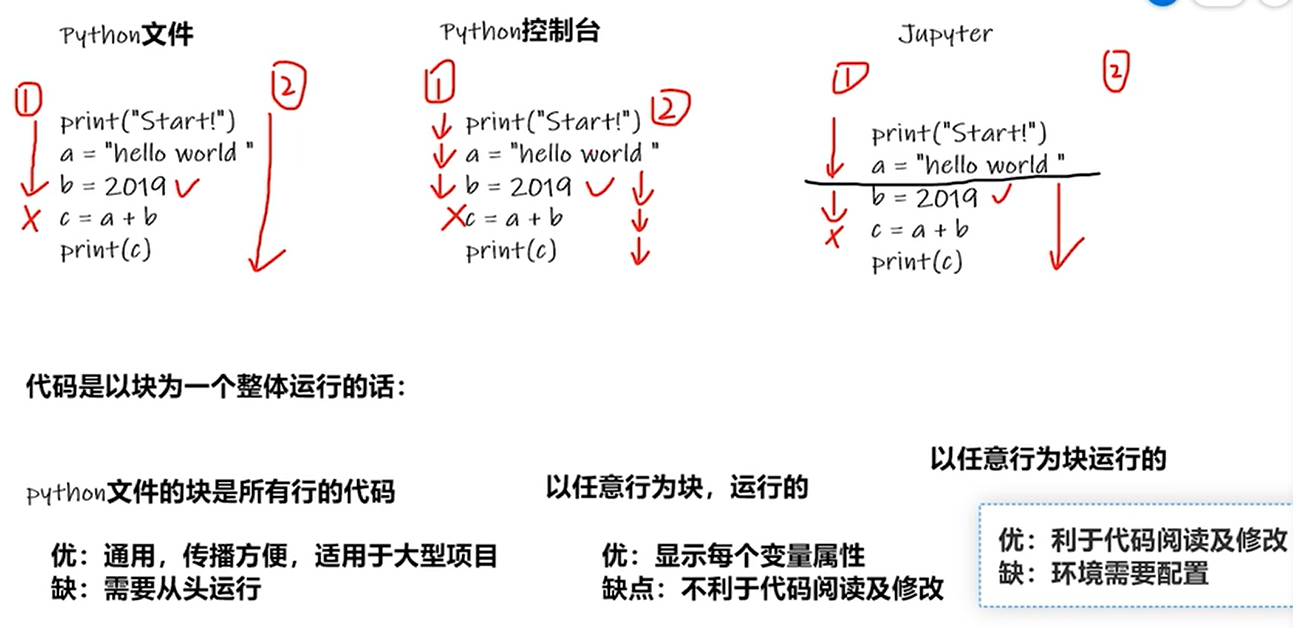
三种代码编辑方式对比
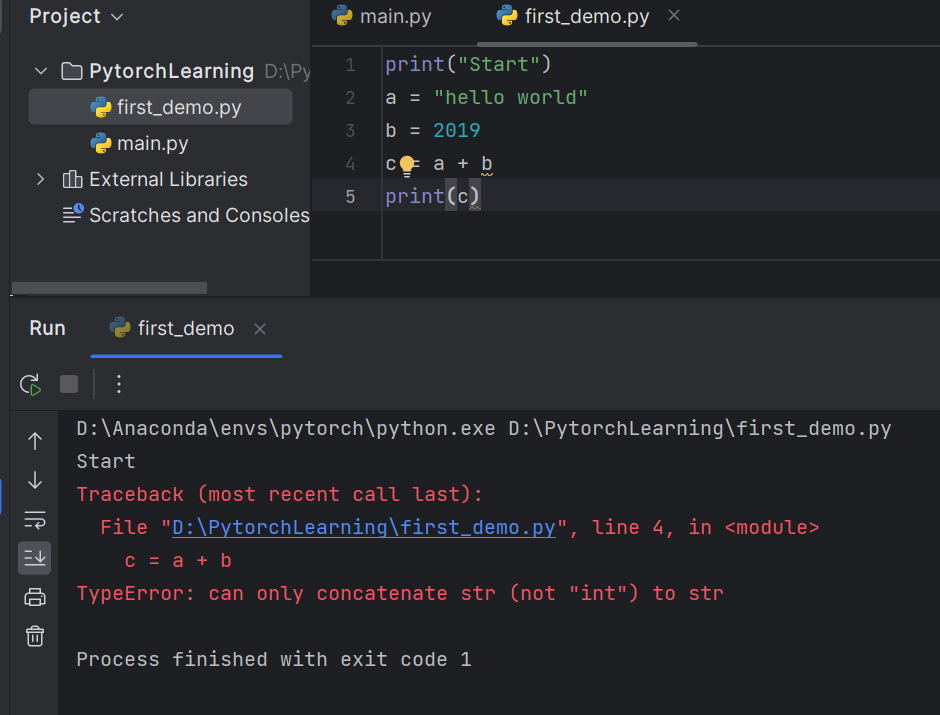
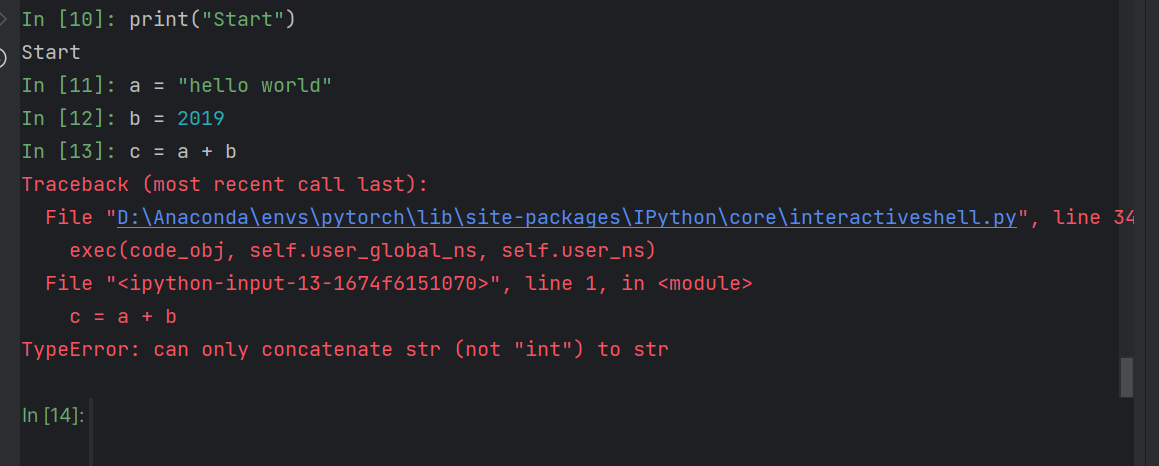
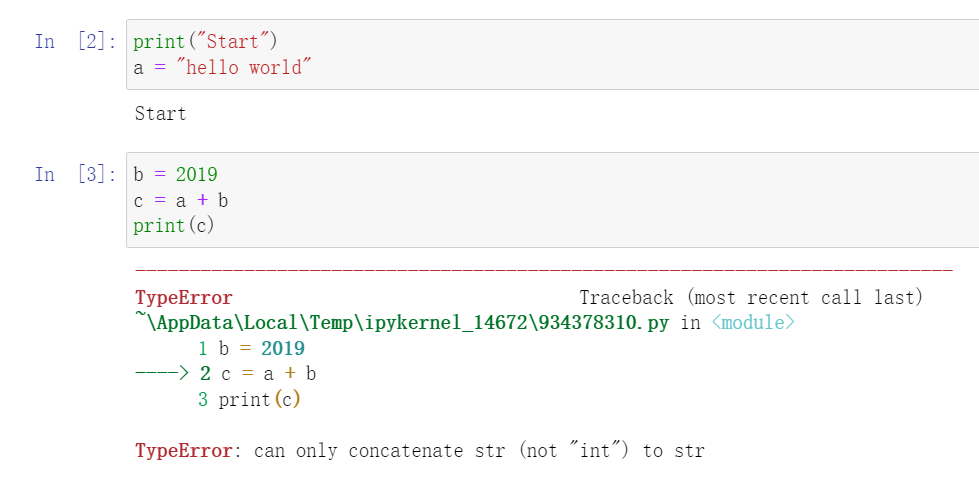
用三种方式运行同一段错误代码
Python文件
![image-20230719142919805](https://cdn.jsdelivr.net/gh/techniquenotes/photohouse@main/Pytorch/Learning%20note/Day1202307201255869.png)
报错,字符串和整型相加不允许
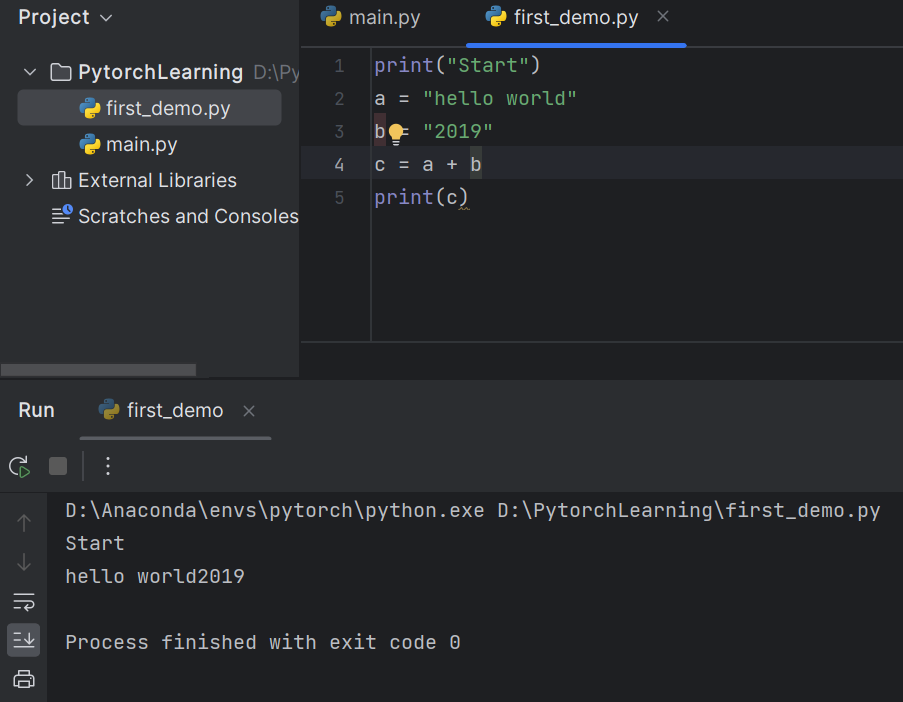
修改b后,运行成功
![image-20230719143050346](https://cdn.jsdelivr.net/gh/techniquenotes/photohouse@main/Pytorch/Learning%20note/Day1202307201255241.png)
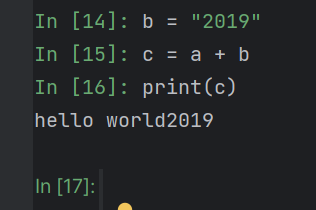
Python控制台
![image-20230719143236205](https://cdn.jsdelivr.net/gh/techniquenotes/photohouse@main/Pytorch/Learning%20note/Day1202307201255322.png)
修改b后
![image-20230719143314888](https://cdn.jsdelivr.net/gh/techniquenotes/photohouse@main/Pytorch/Learning%20note/Day1202307201255432.png)
如果发生错误,代码可读性下降
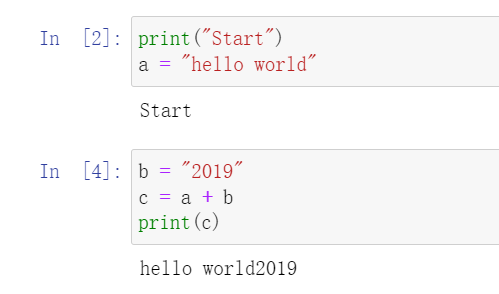
shift+enter可以以多行为一个块运行
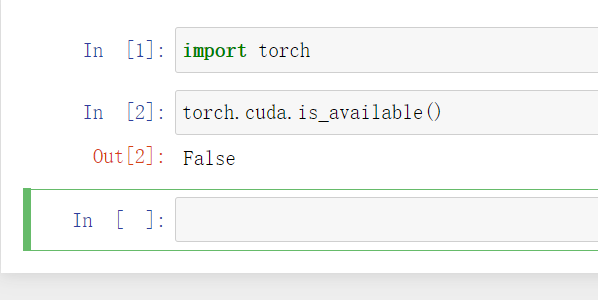
Jupyter
![image-20230719143423641](https://cdn.jsdelivr.net/gh/techniquenotes/photohouse@main/Pytorch/Learning%20note/Day1202307201255001.png)
修改b后
![image-20230719143509947](https://cdn.jsdelivr.net/gh/techniquenotes/photohouse@main/Pytorch/Learning%20note/Day1202307201255789.png)
·总结
![image-20230719144020108](https://cdn.jsdelivr.net/gh/techniquenotes/photohouse@main/Pytorch/Learning%20note/Day1202307201255357.png)
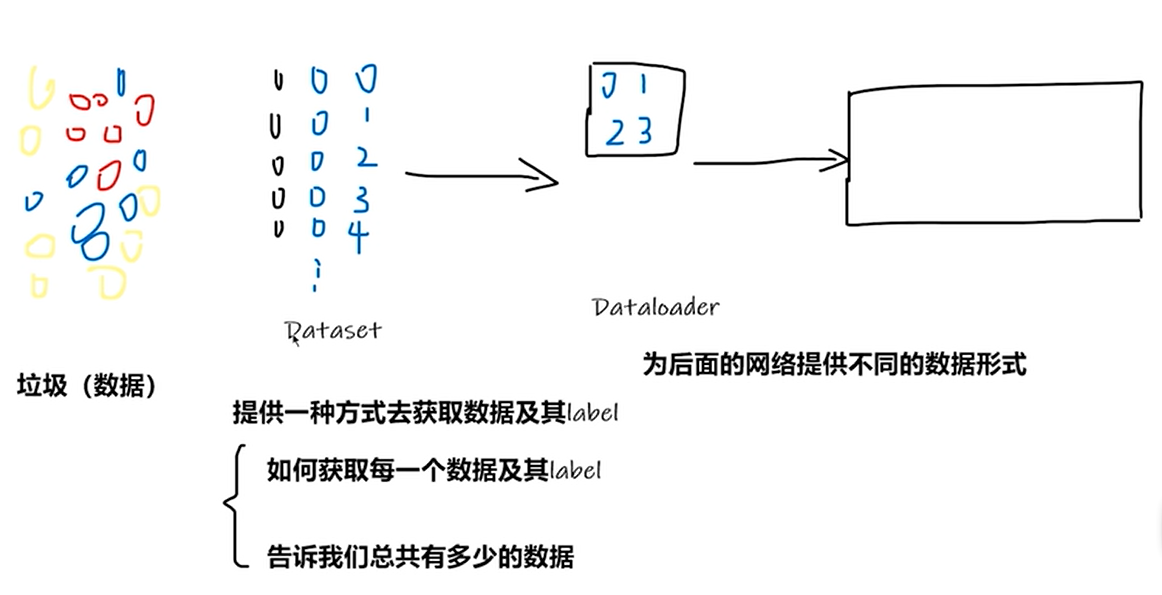
5 Pytorch加载数据初认识
![image-20230719145042656](https://cdn.jsdelivr.net/gh/techniquenotes/photohouse@main/Pytorch/Learning%20note/Day1202307201255707.png)
下载蚂蚁/蜜蜂数据集
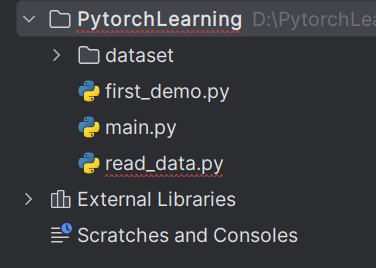
创建read_data.py文件
1 |
|
Jupyter中可查看Dateset内的函数
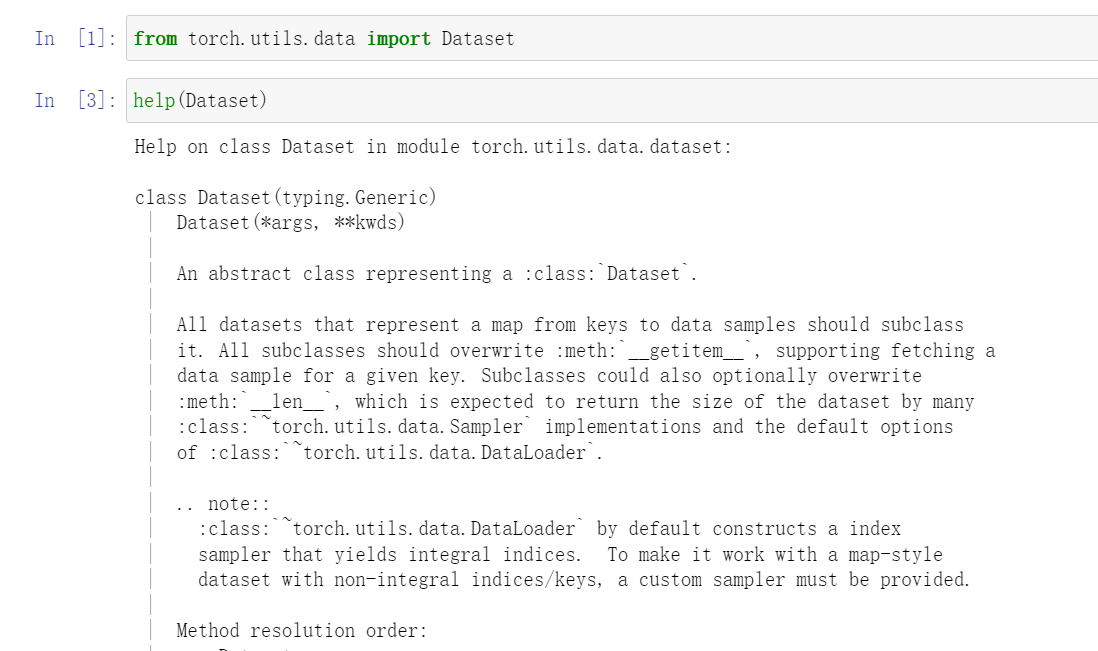
![image-20230719150017028](https://cdn.jsdelivr.net/gh/techniquenotes/photohouse@main/Pytorch/Learning%20note/Day1202307201256186.png)
6 Dataset类代码实战
第一次打开终端报错解决:https://blog.csdn.net/qq_33405617/article/details/119894883
导入Image
1 |
|
将 “蚂蚁/蜜蜂” 数据集复制到项目中
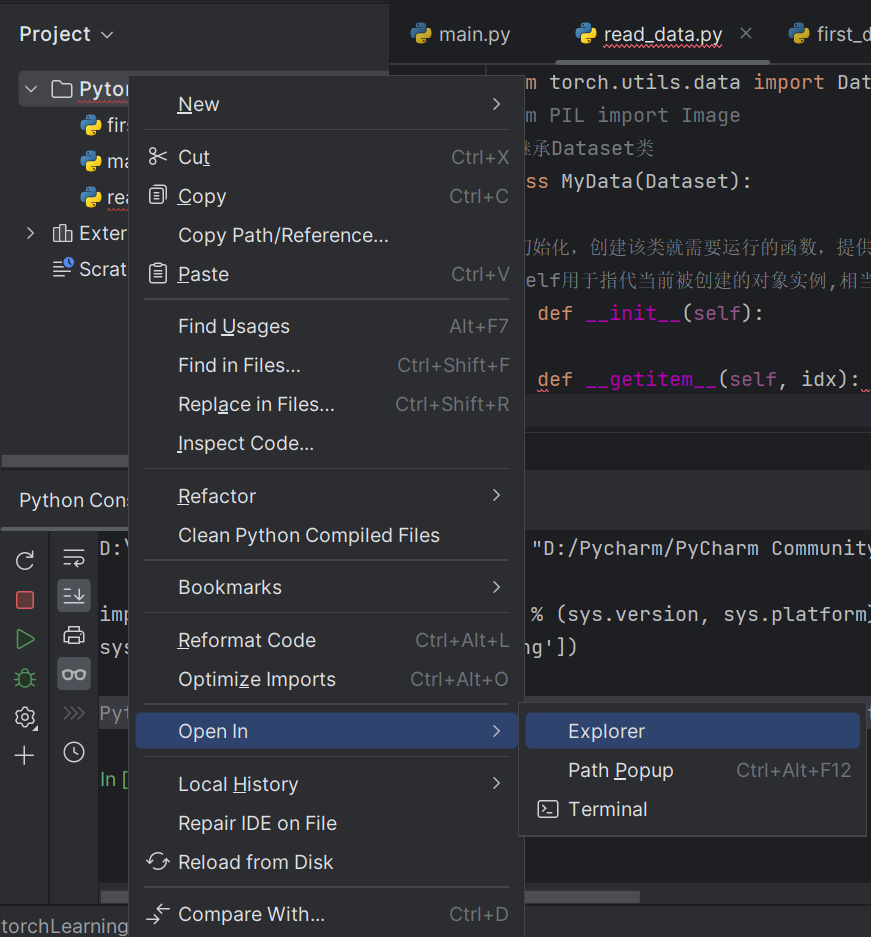
![image-20230719153011629](https://cdn.jsdelivr.net/gh/techniquenotes/photohouse@main/Pytorch/Learning%20note/Day1202307201256929.png)
![image-20230719153152359](https://cdn.jsdelivr.net/gh/techniquenotes/photohouse@main/Pytorch/Learning%20note/Day1202307201256692.png)
Python控制台中读取数据
1 |
|
复制图片绝对路径,\改成\表示转义
1 |
|
1 |
|
1 |
|
1 |
|
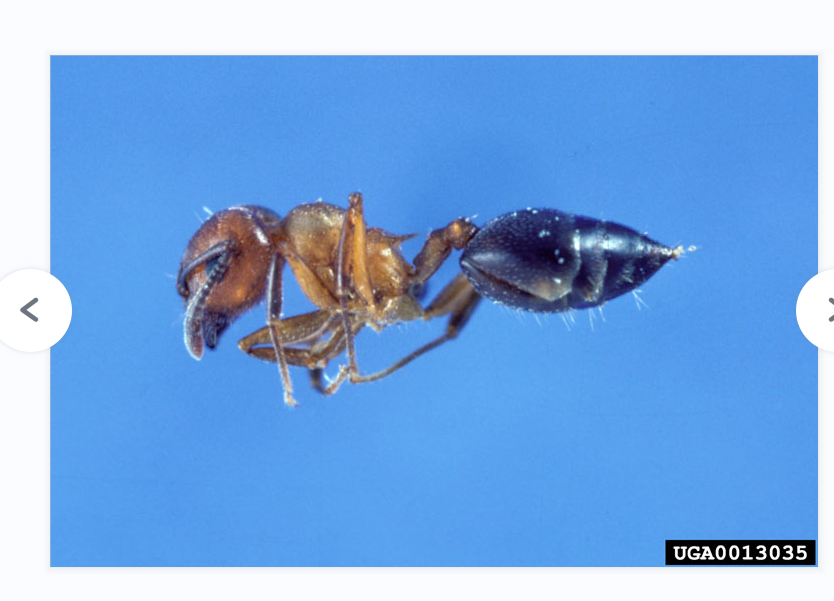
![image-20230719154934779](https://cdn.jsdelivr.net/gh/techniquenotes/photohouse@main/Pytorch/Learning%20note/Day1202307201256350.png)
获取图片名称及路径
控制台方式
1 |
|
python文件方式
1 |
|
数据集长度
1 |
|
创建实例
1 |
|
控制台运行
对象中包含init中的所有变量
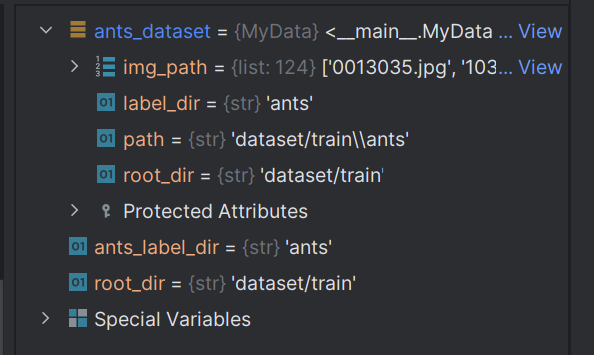
![image-20230719162922969](https://cdn.jsdelivr.net/gh/techniquenotes/photohouse@main/Pytorch/Learning%20note/Day1202307201256144.png)
1 |
|
同时有蚂蚁和蜜蜂数据集
1 |
|
两个数据集集合
1 |
|
txt标签方式
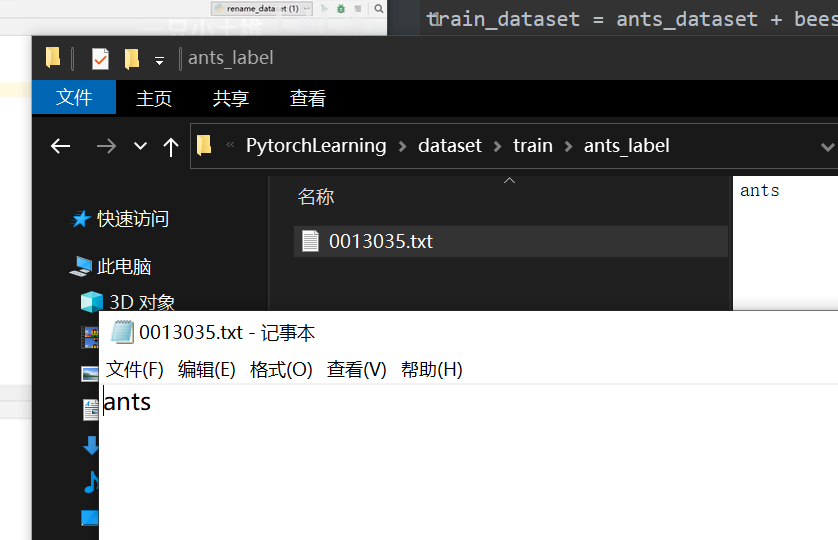
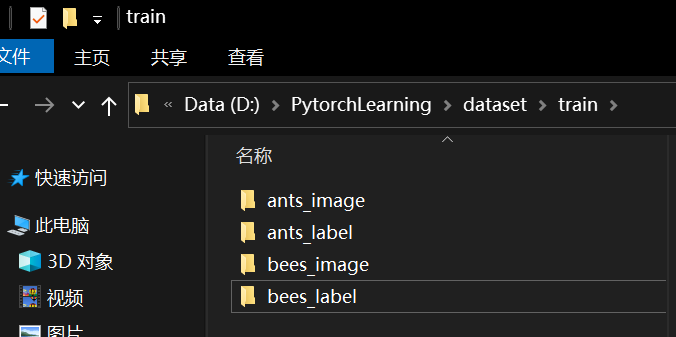
修改数据集文件名,添加标签文件夹
![image-20230719165632515](https://cdn.jsdelivr.net/gh/techniquenotes/photohouse@main/Pytorch/Learning%20note/Day1202307201256435.png)
添加标签
标签txt的名称与图片名称一致,txt内容为标签值
![image-20230719165752353](https://cdn.jsdelivr.net/gh/techniquenotes/photohouse@main/Pytorch/Learning%20note/Day1202307201256609.png)
7 Tensorboard的使用(一)
打开Pycharm,设置环境
1 |
|
add_scalar()方法
1 |
|
安装TensorBoard
![image-20230720100426926](https://cdn.jsdelivr.net/gh/techniquenotes/photohouse@main/Pytorch/Learning%20note/Day2202307201726409.png)
安装后再次运行,左侧多了一个logs文件
终端输入
1 |
|
指定端口
1 |
|
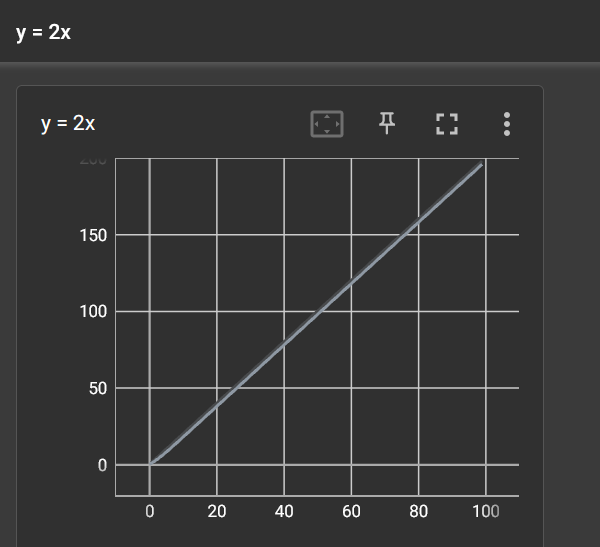
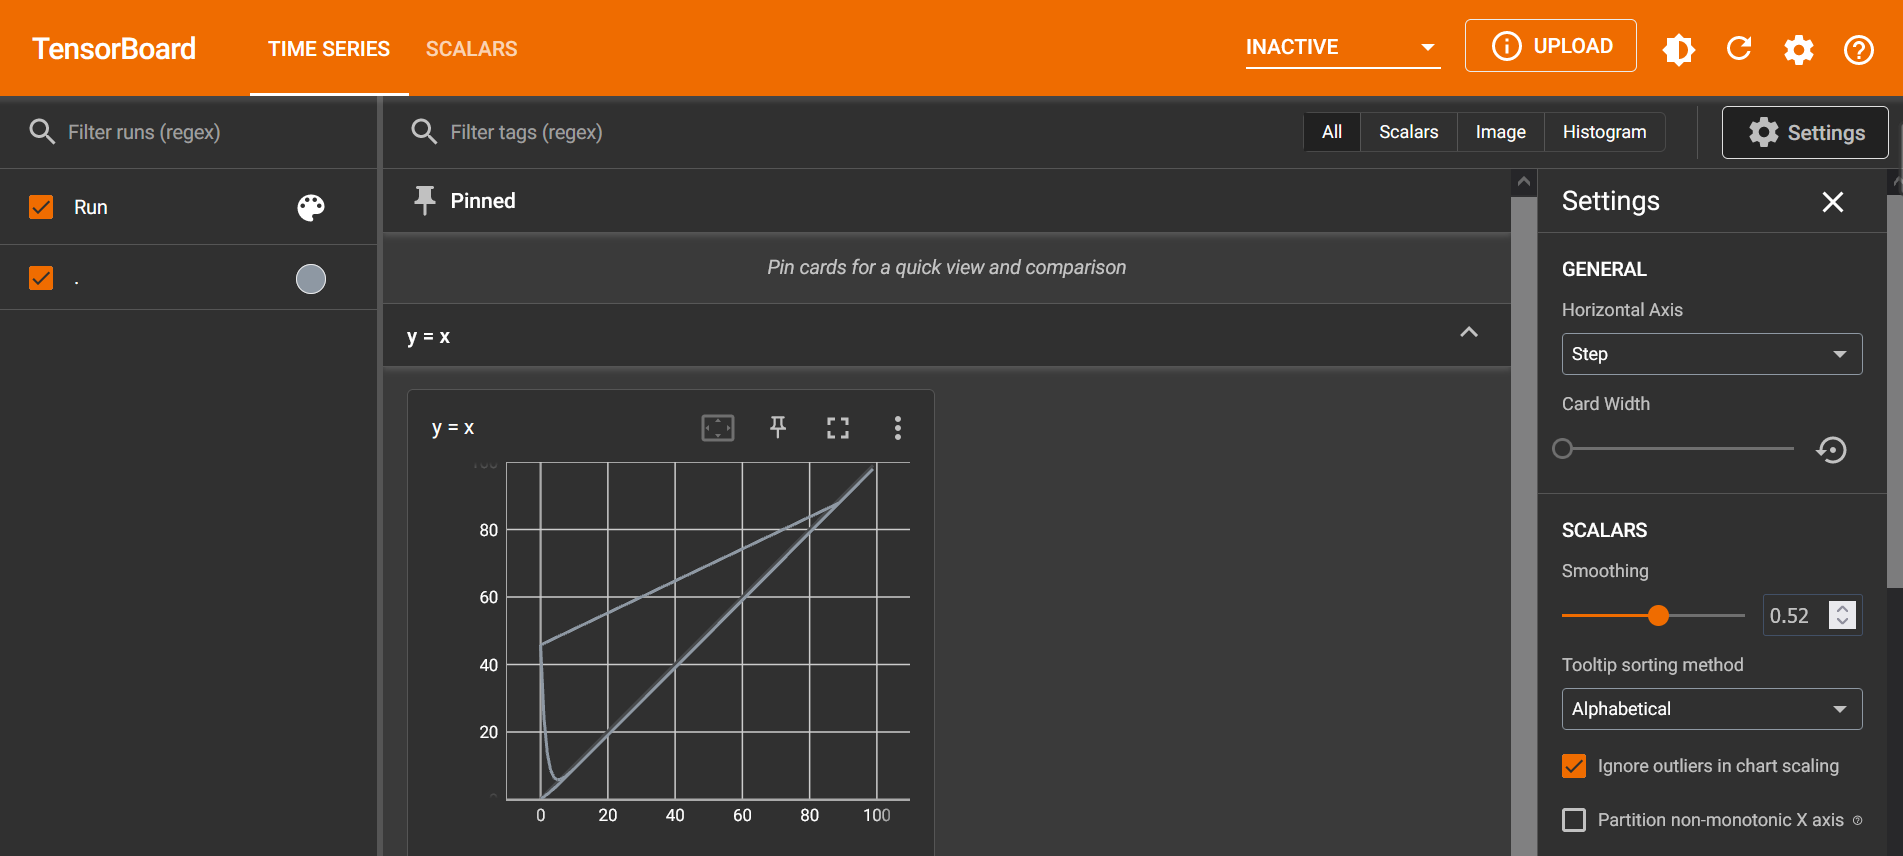
访问端口,显示图像
![image-20230720101433132](https://cdn.jsdelivr.net/gh/techniquenotes/photohouse@main/Pytorch/Learning%20note/Day2202307201726825.png)
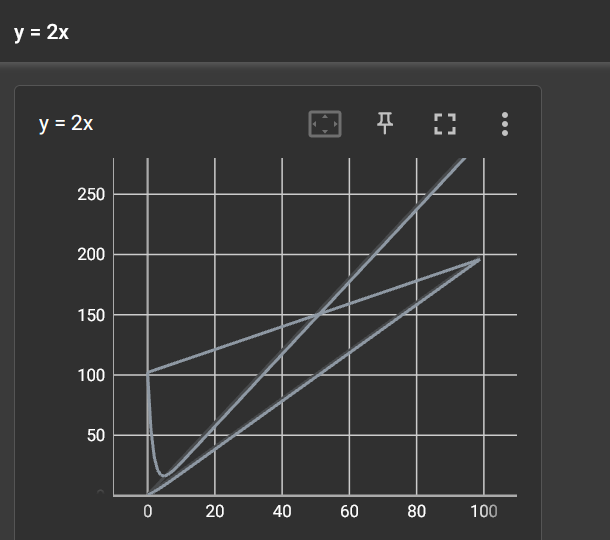
绘制y=2x
1 |
|
![image-20230720101628747](https://cdn.jsdelivr.net/gh/techniquenotes/photohouse@main/Pytorch/Learning%20note/Day2202307201726701.png)
如果不改变add_scalar()函数的标题只改变参数
1 |
|
![image-20230720101754325](https://cdn.jsdelivr.net/gh/techniquenotes/photohouse@main/Pytorch/Learning%20note/Day2202307201726734.png)
向writer中写入新的事件,同时也记录了上一个事件
解决方法:
一、删除logs下的文件,重新启动程序
二、创建子文件夹,也就是说创建新的SummaryWriter(“新文件夹”)
8 TensorBoard的使用(二)add image()的使用(常用来观察训练结果)
控制台输入
1 |
|
利用numpy.array(),对PIL图片进行转换
NumPy型图片是指使用NumPy库表示和处理的图像。NumPy是一个广泛使用的Python库,用于科学计算和数据处理。它提供了一个多维数组对象(ndarray),可以用于存储和操作大量的数值数据。在图像处理领域中,NumPy数组通常用来表示图像的像素值。
NumPy数组可以是一维的(灰度图像)或二维的(彩色图像)。对于彩色图像,通常使用三维的NumPy数组表示,其中第一个维度表示图像的行数,第二个维度表示图像的列数,第三个维度表示图像的通道数(例如,红、绿、蓝通道)
控制台
1 |
|
文件内
1 |
|
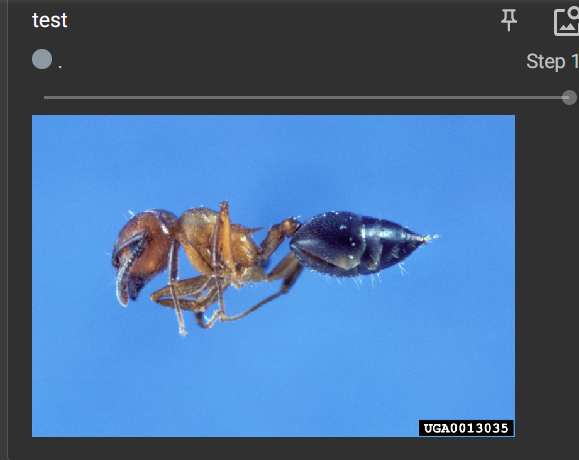
从PIL到numpy, 需要在add image()中指定shape中每一个数字/维表示的含义。
打开端口,显示图像
![image-20230720104855434](https://cdn.jsdelivr.net/gh/techniquenotes/photohouse@main/Pytorch/Learning%20note/Day2202307201726463.png)
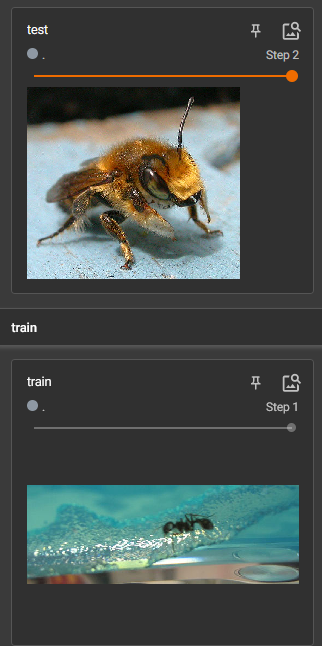
添加蜜蜂图片,修改步长为2
1 |
|
![image-20230720105220800](C:/Users/ge'yu/AppData/Roaming/Typora/typora-user-images/image-20230720105220800.png)
更换标题
1 |
|
![image-20230720105351794](https://cdn.jsdelivr.net/gh/techniquenotes/photohouse@main/Pytorch/Learning note/Day2202307201726332.png)
9 Transforms 的使用(一)
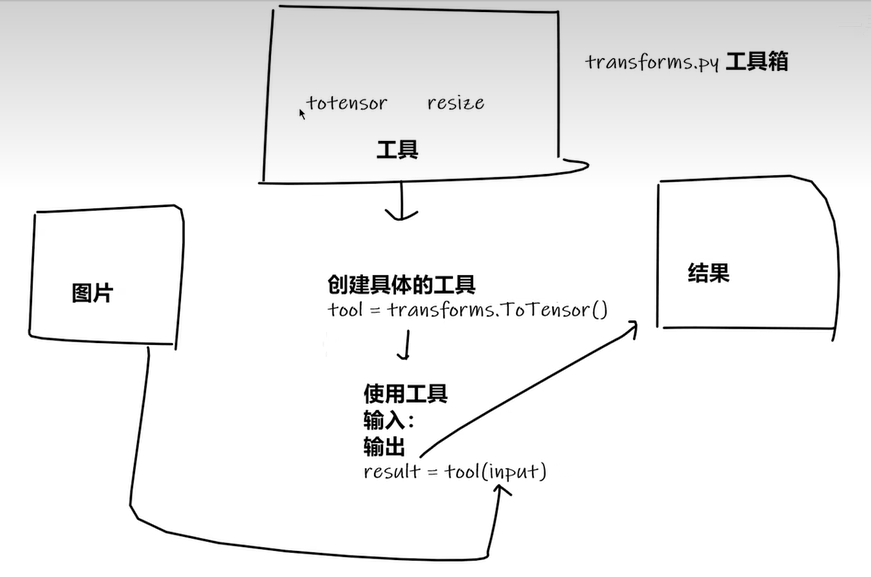
transforms结构及用法
![image-20230720112701203](https://cdn.jsdelivr.net/gh/techniquenotes/photohouse@main/Pytorch/Learning%20note/Day2202307201727532.png)
ctrl+p可提示函数需要什么参数
1 |
|
10Transforms的使用(二)
![image-20230720113024746](https://cdn.jsdelivr.net/gh/techniquenotes/photohouse@main/Pytorch/Learning%20note/Day2202307201727314.png)
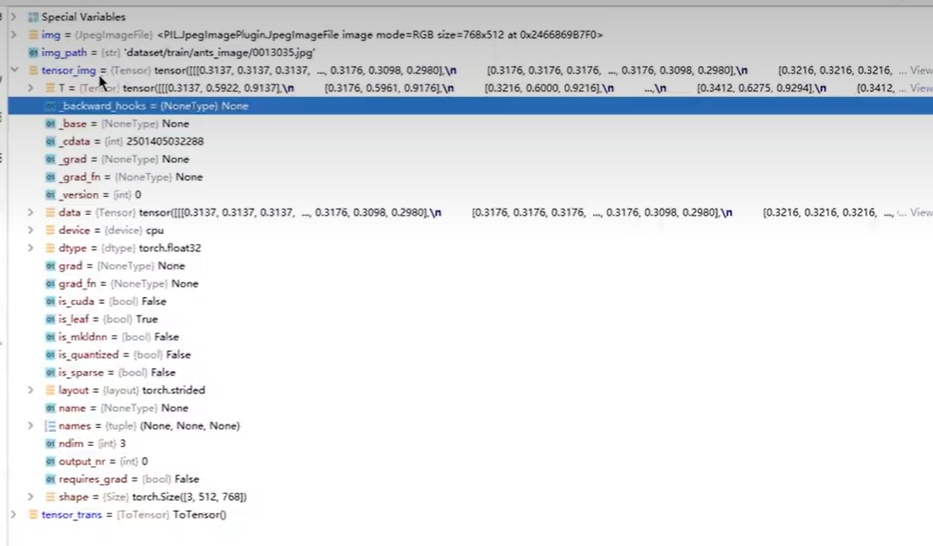
Tensor包括深度学习需要的参数
下载Opencv
终端输入
1 |
|
控制台
1 |
|
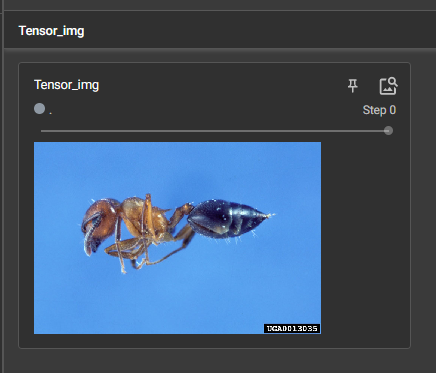
利用Tensor_img显示图片
1 |
|
终端输入
1 |
|
打开端口,显示图片
![image-20230720115601972](https://cdn.jsdelivr.net/gh/techniquenotes/photohouse@main/Pytorch/Learning%20note/Day2202307201727795.png)
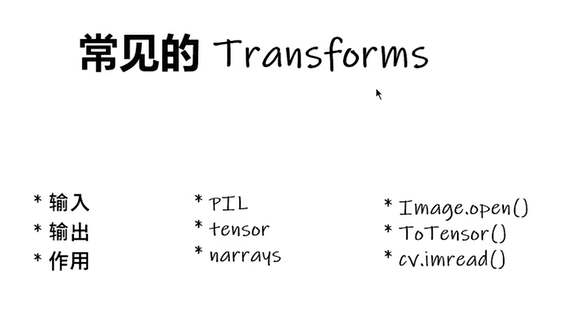
11 常见的Transforms(一)
![image-20230720141126141](https://cdn.jsdelivr.net/gh/techniquenotes/photohouse@main/Pytorch/Learning%20note/Day2202307201727366.png)
Pytorch中call()的用法
1 |
|
ToTensor的使用
1 |
|
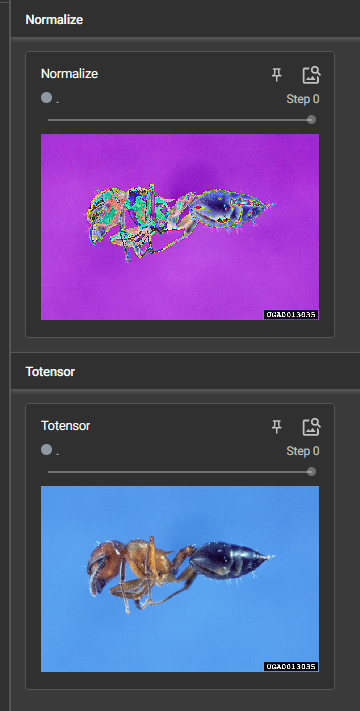
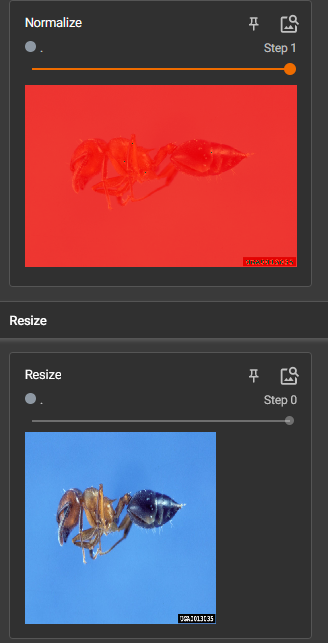
Normalize() 归一化 的使用
![image-20230720143339908](https://cdn.jsdelivr.net/gh/techniquenotes/photohouse@main/Pytorch/Learning%20note/Day2202307201727404.png)
mean是均值,std是标准差
1 |
|
输出归一化结果
1 |
|
![image-20230720143837709](https://cdn.jsdelivr.net/gh/techniquenotes/photohouse@main/Pytorch/Learning%20note/Day2202307201727313.png)
12 常见的Transforms(二)
Resize()的使用
1 |
|
将PIL类型的img_resize转为tensor类型
1 |
|
图片大小改变
![image-20230720150314504](https://cdn.jsdelivr.net/gh/techniquenotes/photohouse@main/Pytorch/Learning%20note/Day2202307201727271.png)
Compose()的使用
将不同的操作组合起来,按顺序执行。前一步的输出是下一步的输入,要对应。
Compose()中的参数需要是一个列表。Python中,列表的表示形式为[数据1,数据2,…]。在Composel中,数据需要是transforms类型,所以得到,Compose([transforms参数1,transforms参数2,…])
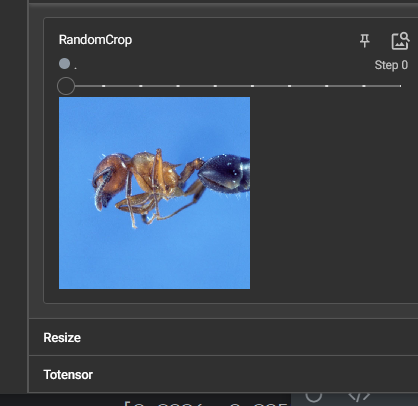
RandomCrop()随机裁剪的用法
1 |
|
![image-20230720152147175](https://cdn.jsdelivr.net/gh/techniquenotes/photohouse@main/Pytorch/Learning%20note/Day2202307201727464.png)
总结使用方法
- 关注输入和输出类型
- 多看官方文档
- 关注方法需要什么参数
- 不知道返回值的时候
- print()
- print(type())
- debug
13 torchvision中的数据集使用
下载训练集和测试集
1 |
|
可以用迅雷加快下载速度
1 |
|
classes内表示每种target对应哪种类别
1 |
|
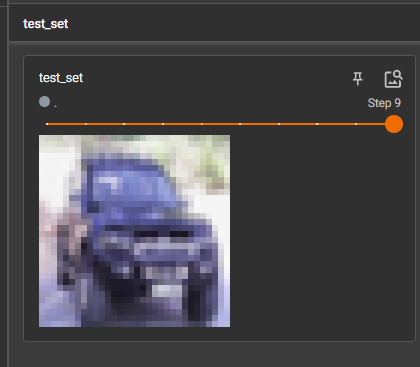
添加Transform参数
1 |
|
![image-20230720161746404](https://cdn.jsdelivr.net/gh/techniquenotes/photohouse@main/Pytorch/Learning%20note/Day2202307201727933.png)
14 DataLoader的使用
测试数据集中第一张图片及target
1 |
|
![image-20230720164801159](https://cdn.jsdelivr.net/gh/techniquenotes/photohouse@main/Pytorch/Learning%20note/Day2202307201728188.png)
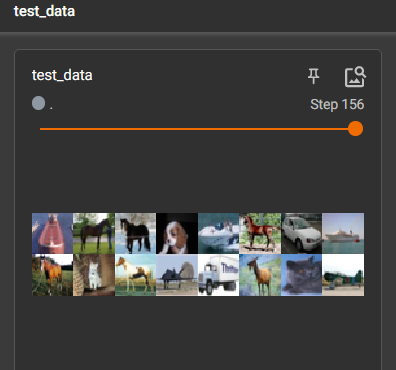
理解batch_size
1 |
|
更改batch_size=64
1 |
|
![image-20230720171254181](https://cdn.jsdelivr.net/gh/techniquenotes/photohouse@main/Pytorch/Learning%20note/Day2202307201728884.png)
drop_last设置为false,所以不会丢掉数量小于batch_seze的组。
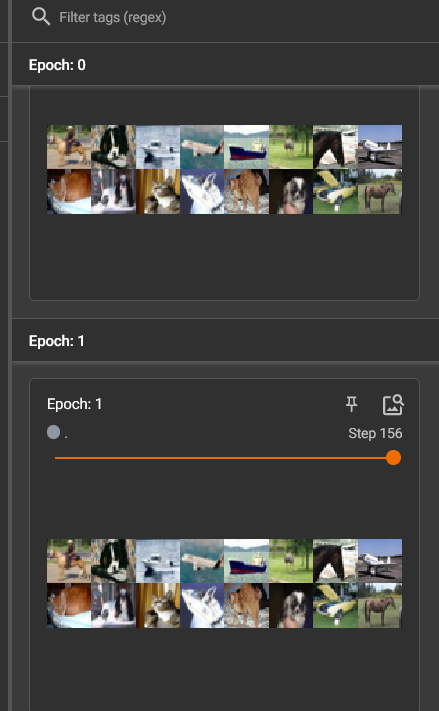
理解shuffle
添加epoch
1 |
|
shuffle为false时两轮图片加载中随机选取结果相同
15 神经网络的基本骨架-nn.Module的使用
![image-20230720204614822](https://cdn.jsdelivr.net/gh/techniquenotes/photohouse@main/Pytorch/Learning%20note/Day3/202307212127626.png)
自定义神经网络
重写方法
1 |
|
16 卷积操作
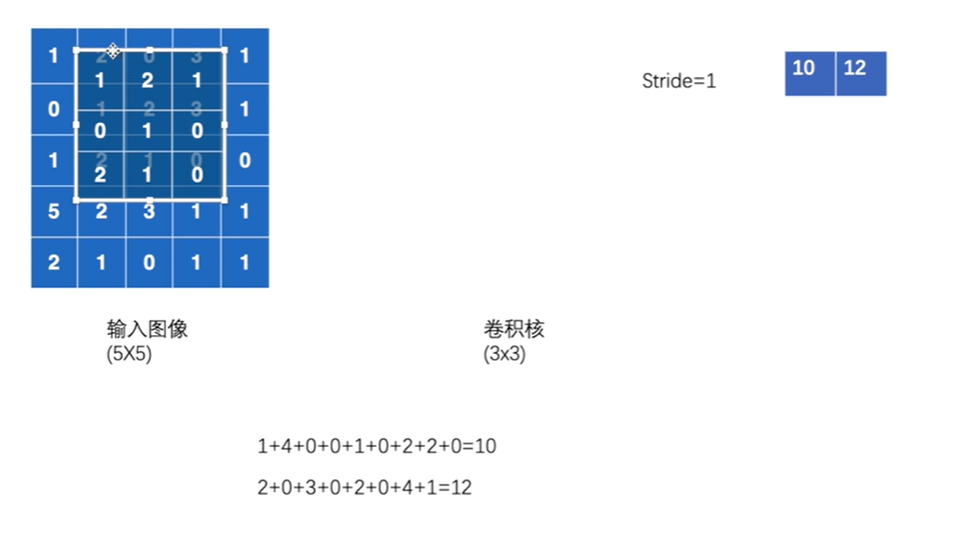
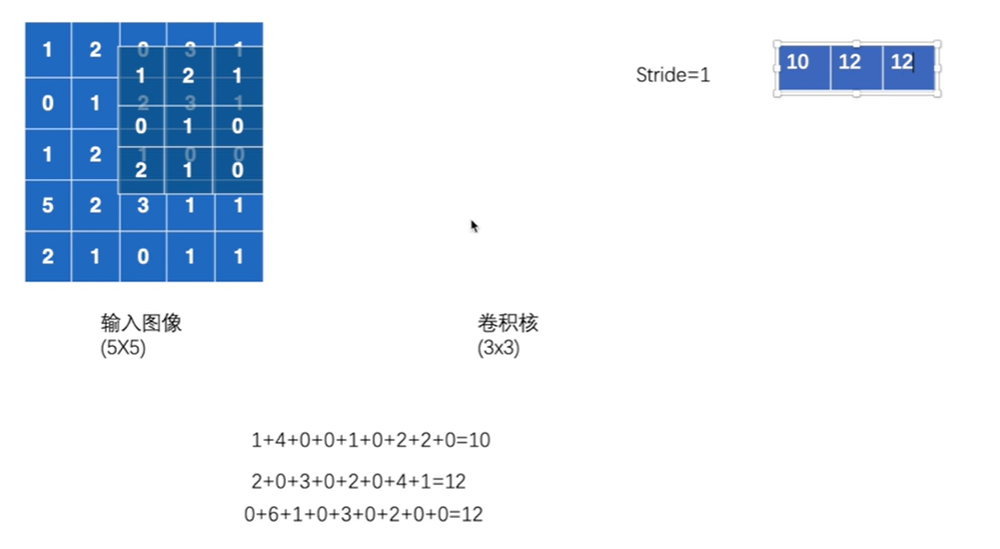
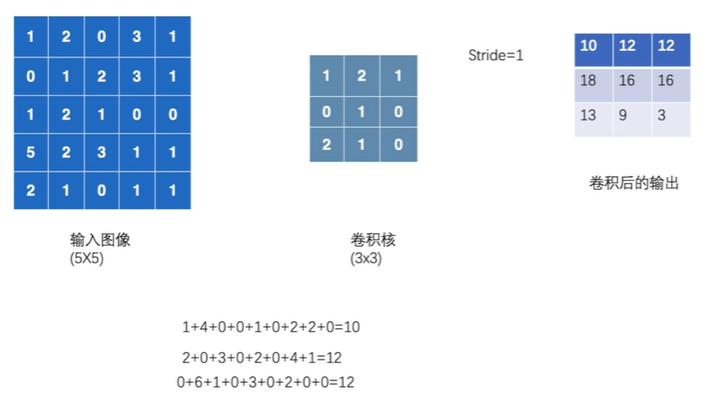
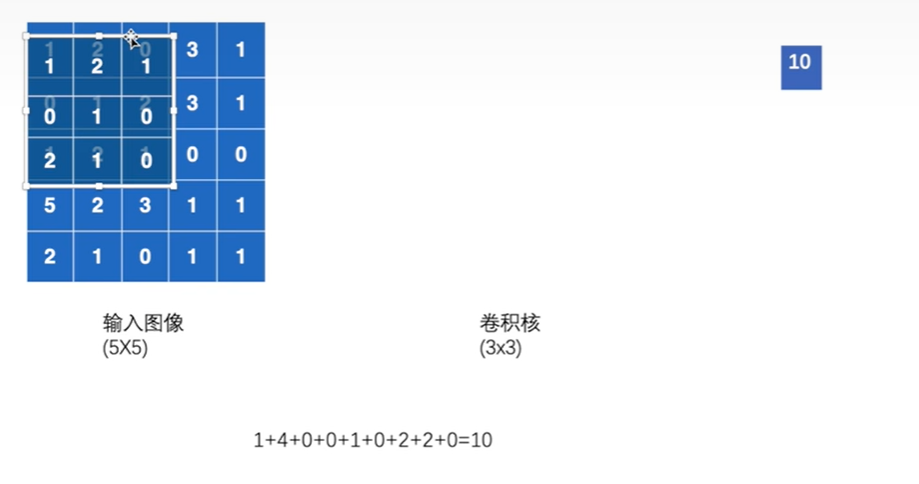
卷积核移动,每个位置,卷积核的每一小块与输入图像重叠部分每一小块的相乘,所有乘积相加即为输出的一个小块
![image-20230720210532679](https://cdn.jsdelivr.net/gh/techniquenotes/photohouse@main/Pytorch/Learning%20note/Day3/202307212128784.png)
Stride为卷积核每次移动的步数
![image-20230720210651404](https://cdn.jsdelivr.net/gh/techniquenotes/photohouse@main/Pytorch/Learning%20note/Day3/202307212128132.png)
![image-20230720210746107](https://cdn.jsdelivr.net/gh/techniquenotes/photohouse@main/Pytorch/Learning%20note/Day3/202307212128270.png)
![image-20230720212346920](https://cdn.jsdelivr.net/gh/techniquenotes/photohouse@main/Pytorch/Learning%20note/Day3/202307212128145.png)
编写程序
1 |
|
使用reshape()
1 |
|
实现卷积操作
1 |
|
改变stride 步幅
1 |
|
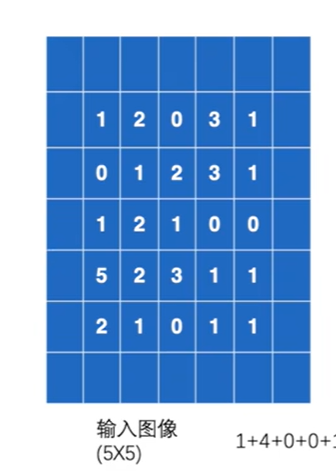
Padding 填充
图像周围填充0
![image-20230720212848323](https://cdn.jsdelivr.net/gh/techniquenotes/photohouse@main/Pytorch/Learning%20note/Day3/202307212128205.png)
1 |
|
17 神经网络-卷积层
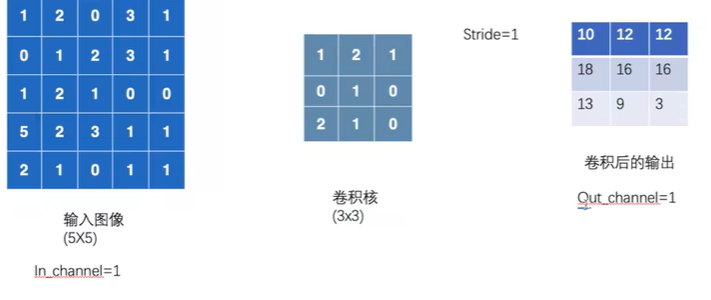
In_channel输入通道和Out_channel输出通道
![image-20230720221004485](https://cdn.jsdelivr.net/gh/techniquenotes/photohouse@main/Pytorch/Learning%20note/Day3/202307212128005.png)
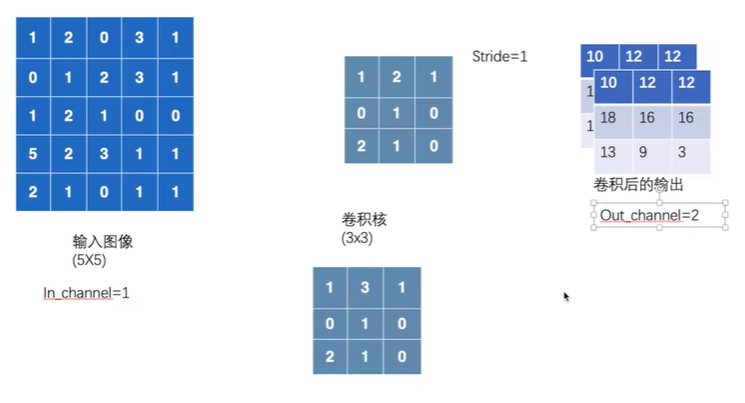
out_channel为2时
卷积操作完成后输出的 out_channels,取决于卷积核的数量。
![image-20230720221112952](https://cdn.jsdelivr.net/gh/techniquenotes/photohouse@main/Pytorch/Learning%20note/Day3/202307212128788.png)
编写代码验证
1 |
|
1 |
|
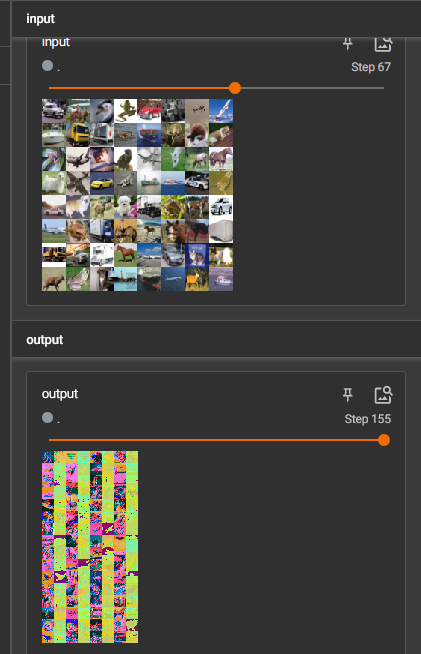
output为6个channel无法用writer显示,用reshape变为3个channel
1 |
|
![image-20230721105114448](https://cdn.jsdelivr.net/gh/techniquenotes/photohouse@main/Pytorch/Learning%20note/Day3/202307212128048.png)
18 最大池的使用
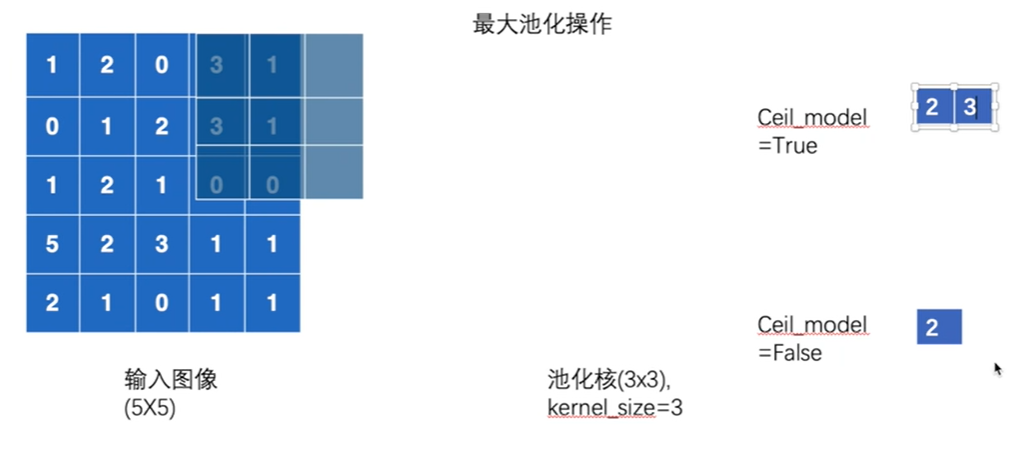
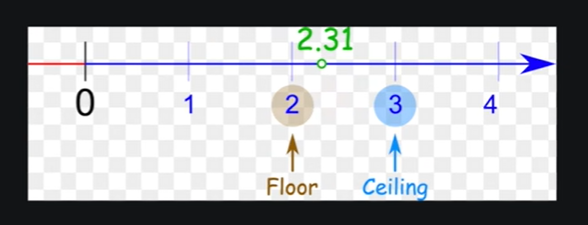
ceil mode和floor mode
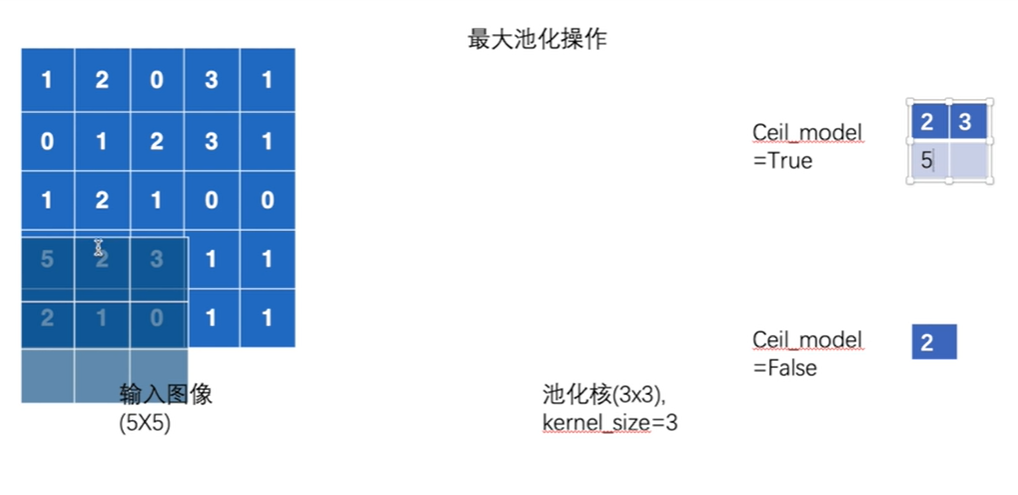
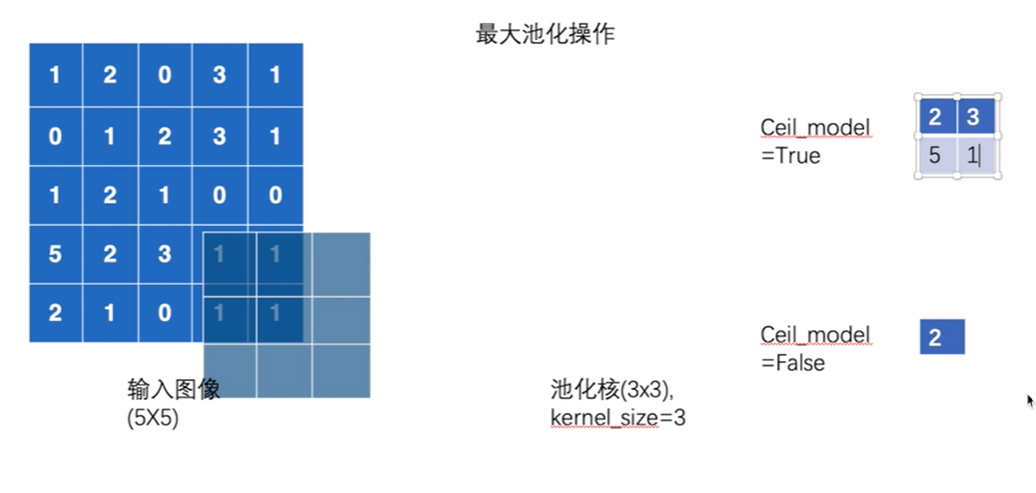
ceil mode是向上取整,floor mode是向下取整
具体到池化操作,ceil mode指如果池化核覆盖范围内有空缺,还是保留空缺继续池化;floor mode就会将空缺舍弃,不对其进行池化。
![image-20230721111639352](https://cdn.jsdelivr.net/gh/techniquenotes/photohouse@main/Pytorch/Learning%20note/Day3/202307212128700.png)
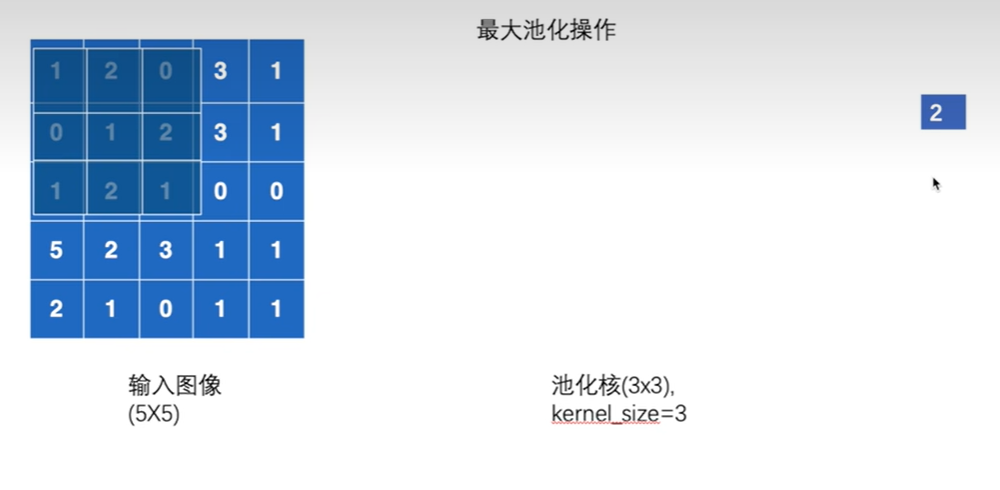
每次找出被池化核覆盖的范围内的最大值输出
![image-20230721111510866](https://cdn.jsdelivr.net/gh/techniquenotes/photohouse@main/Pytorch/Learning%20note/Day3/202307212128281.png)
步幅为kernel_size的大小,3
Ceil mode
![image-20230721111944689](https://cdn.jsdelivr.net/gh/techniquenotes/photohouse@main/Pytorch/Learning%20note/Day3/202307212128639.png)
![image-20230721112032005](https://cdn.jsdelivr.net/gh/techniquenotes/photohouse@main/Pytorch/Learning%20note/Day3/202307212129643.png)
![image-20230721112059463](https://cdn.jsdelivr.net/gh/techniquenotes/photohouse@main/Pytorch/Learning%20note/Day3/202307212129583.png)
默认情况ceil mode为false,即不保留
代码演示
1 |
|
Ceil mode为False
1 |
|
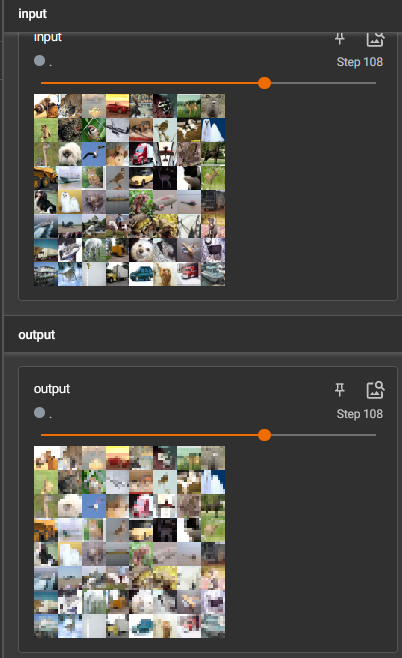
最大池化的作用
保留数据特征,减小数据量
1 |
|
![image-20230721113804610](https://cdn.jsdelivr.net/gh/techniquenotes/photohouse@main/Pytorch/Learning%20note/Day3/202307212129965.png)
19 非线性激活
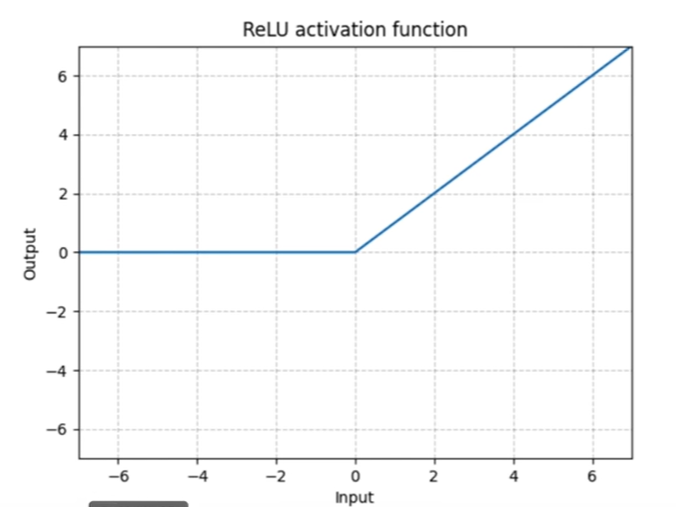
以ReLU为例
![image-20230721114225891](https://cdn.jsdelivr.net/gh/techniquenotes/photohouse@main/Pytorch/Learning%20note/Day3/202307212129815.png)
参数inPlace
表示是否对原来变量进行变换,默认是False
![image-20230721114819121](https://cdn.jsdelivr.net/gh/techniquenotes/photohouse@main/Pytorch/Learning%20note/Day3/202307212129845.png)
1 |
|
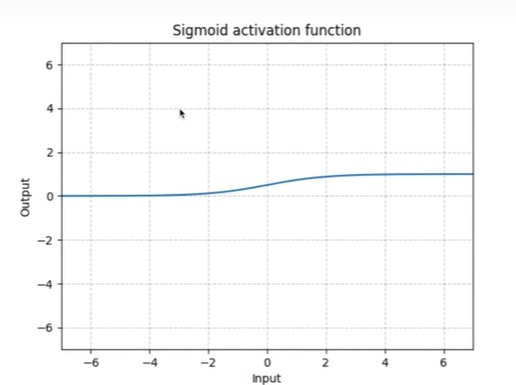
Sigmoid函数
![image-20230721115922770](https://cdn.jsdelivr.net/gh/techniquenotes/photohouse@main/Pytorch/Learning%20note/Day3/202307212129448.png)
1 |
|
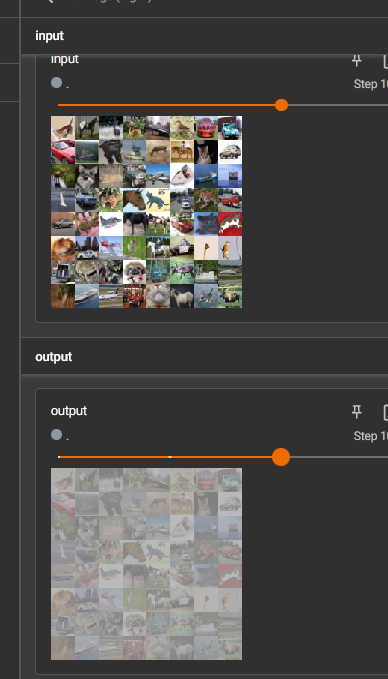
![image-20230721120003234](https://cdn.jsdelivr.net/gh/techniquenotes/photohouse@main/Pytorch/Learning%20note/Day3/202307212129198.png)
20 线性层及其它层介绍
线性层
![image-20230721142029222](https://cdn.jsdelivr.net/gh/techniquenotes/photohouse@main/Pytorch/Learning%20note/Day3/202307212129928.png)
5×5经过reshape变为1×25,再经过线性层变为1×3
![image-20230721142249064](https://cdn.jsdelivr.net/gh/techniquenotes/photohouse@main/Pytorch/Learning%20note/Day3/202307212129920.png)
1 |
|
Flatten()函数
可以把输入展成一行,变为一维向量
1 |
|
21 搭建小实战和Sequential的使用
![image-20230721160609054](https://cdn.jsdelivr.net/gh/techniquenotes/photohouse@main/Pytorch/Learning%20note/Day3/202307212129225.png)
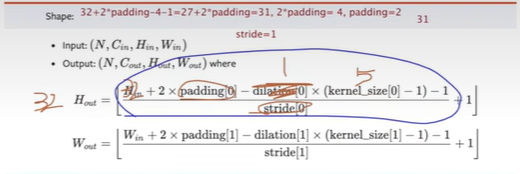
卷积的padding和stride可以用公式计算
![image-20230721154938067](https://cdn.jsdelivr.net/gh/techniquenotes/photohouse@main/Pytorch/Learning%20note/Day3/202307212129852.png)
padding为2,stride为1
![image-20230721160010309](https://cdn.jsdelivr.net/gh/techniquenotes/photohouse@main/Pytorch/Learning%20note/Day3/202307212129734.png)
创建网络
1 |
|
检查网络正确性
1 |
|
Sequential使用
代码更简洁
1 |
|
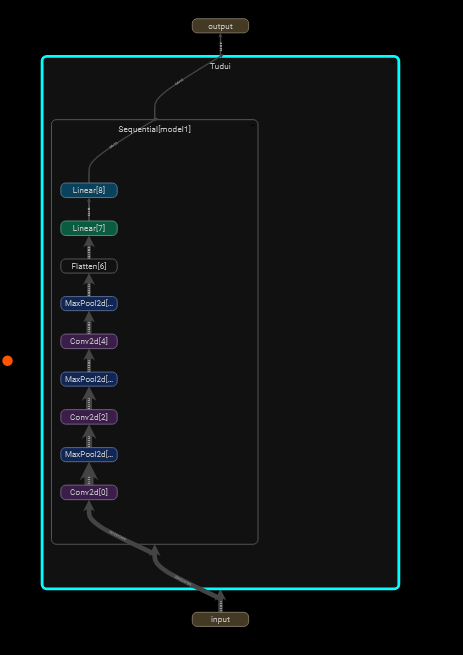
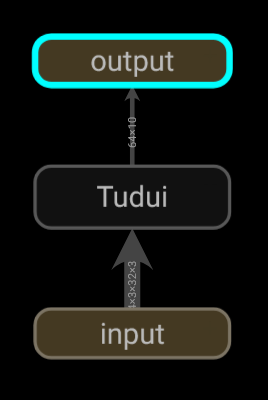
add_graph()显示训练过程
1 |
|
![image-20230721162855578](https://cdn.jsdelivr.net/gh/techniquenotes/photohouse@main/Pytorch/Learning%20note/Day3/202307212130816.png)
双击查看细节
![image-20230721162914891](https://cdn.jsdelivr.net/gh/techniquenotes/photohouse@main/Pytorch/Learning%20note/Day3/202307212130215.png)
22 损失函数与反向传播
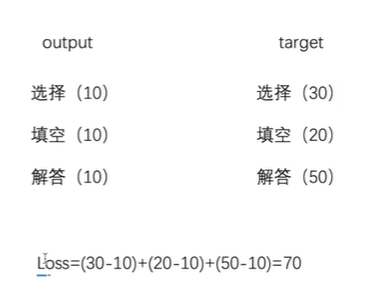
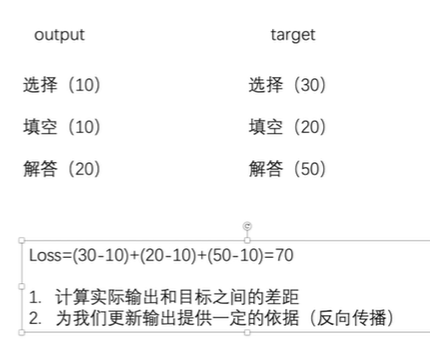
![image-20230721164558100](https://cdn.jsdelivr.net/gh/techniquenotes/photohouse@main/Pytorch/Learning%20note/Day3/202307212130826.png)
![image-20230721164717441](https://cdn.jsdelivr.net/gh/techniquenotes/photohouse@main/Pytorch/Learning%20note/Day3/202307212130961.png)
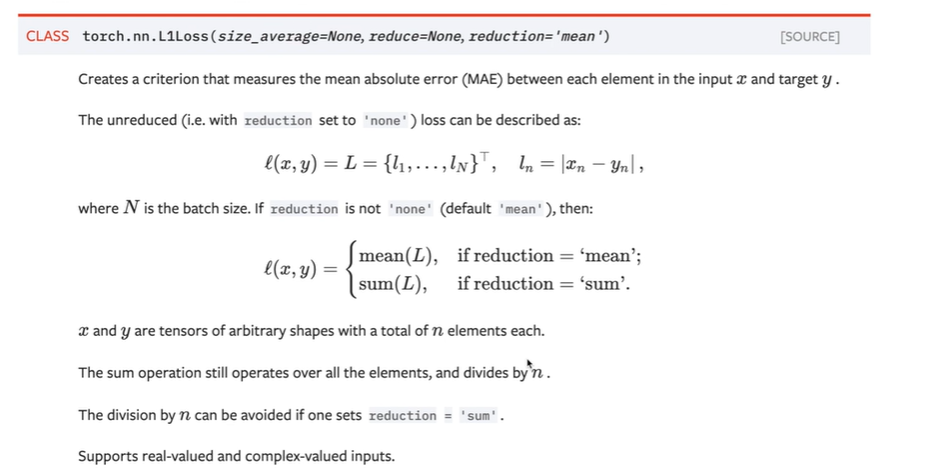
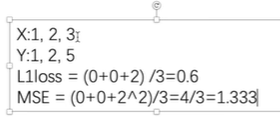
L1loss 函数
![image-20230721164934328](https://cdn.jsdelivr.net/gh/techniquenotes/photohouse@main/Pytorch/Learning%20note/Day3/202307212130420.png)
1 |
|
改变reduction
1 |
|
MSELOSS 平方差
1 |
|
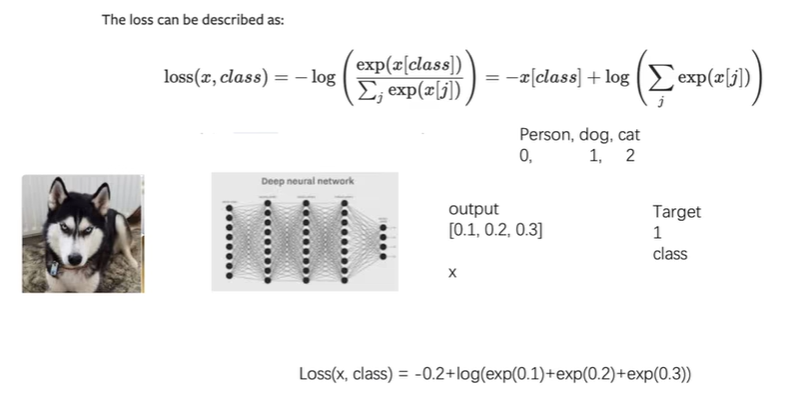
交叉熵
分类问题。下图的log应该是ln
![image-20230721171349447](https://cdn.jsdelivr.net/gh/techniquenotes/photohouse@main/Pytorch/Learning%20note/Day3/202307212130704.png)
1 |
|
查看输出和target
1 |
|
添加交叉熵
1 |
|
梯度下降法
1 |
|
23 优化器(一)
1 |
|
24 现有网络模型的使用及修改
VGG16
最后out_feature为1000,表明1000个分类
1 |
|
给vgg16多添加一个线性层,实现10个分类
1 |
|
将线性层加到classifier中
1 |
|
1 |
|
25 网络模型的保存与读取
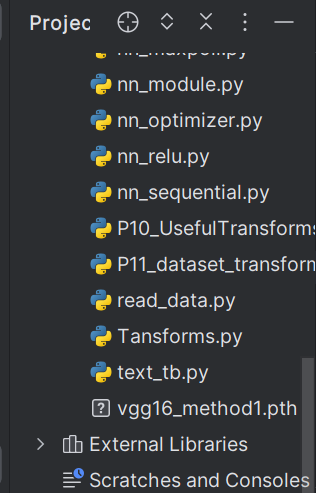
保存vgg16
1 |
|
![image-20230721210321691](https://cdn.jsdelivr.net/gh/techniquenotes/photohouse@main/Pytorch/Learning%20note/Day3/202307212130455.png)
加载模型
1 |
|
保存方式2
1 |
|
恢复成网络模型
新建网路模型结构
1 |
|
方式1陷阱
保存模型
1 |
|
加载时报错
1 |
|
需要将模型的定义放在需要加载的文件
1 |
|
26 完整的模型训练
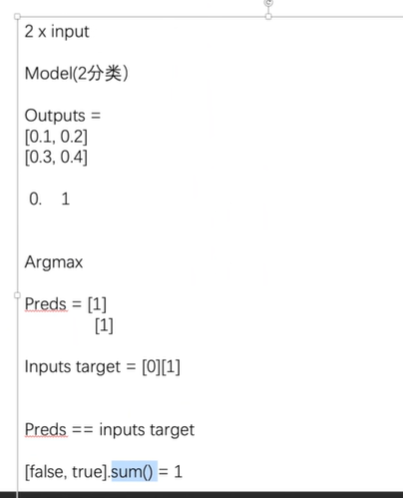
Argmax
输入两张图片,通过outputs得到预测类别Preds
将Preds与Inputs target比较。
[false, true].sum()=1,false看成0,true看成1
![image-20230722155229401](https://cdn.jsdelivr.net/gh/techniquenotes/photohouse@main/Pytorch/Learning%20note/Day3/202307222023245.png)
1 |
|
1 |
|
完整代码
model.py
1 |
|
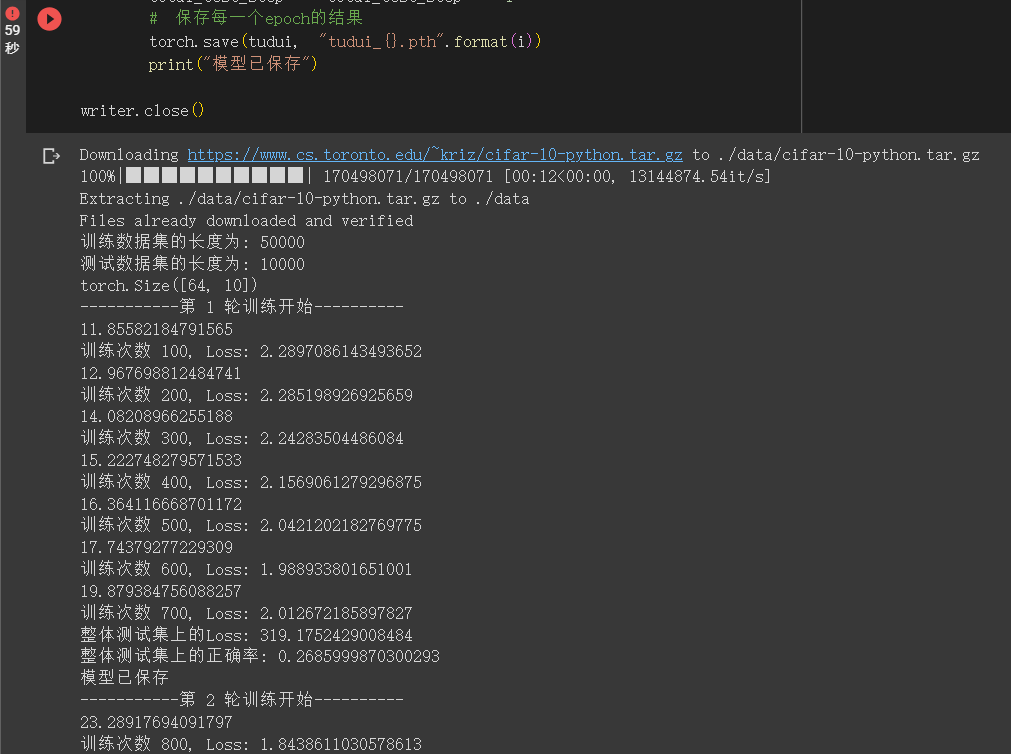
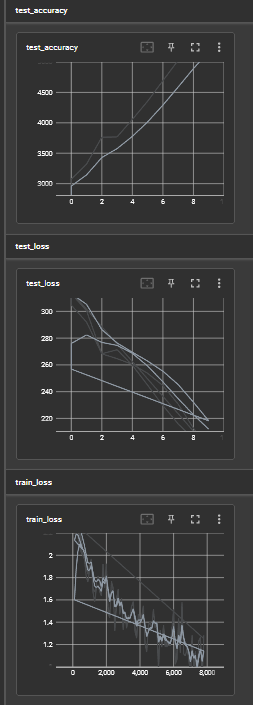
训练和测试代码
1 |
|
![image-20230722162840740](https://cdn.jsdelivr.net/gh/techniquenotes/photohouse@main/Pytorch/Learning%20note/Day3/202307222024261.png)
注意点
train()和eval()
1 |
|
27 利用GPU训练(一)
1 |
|
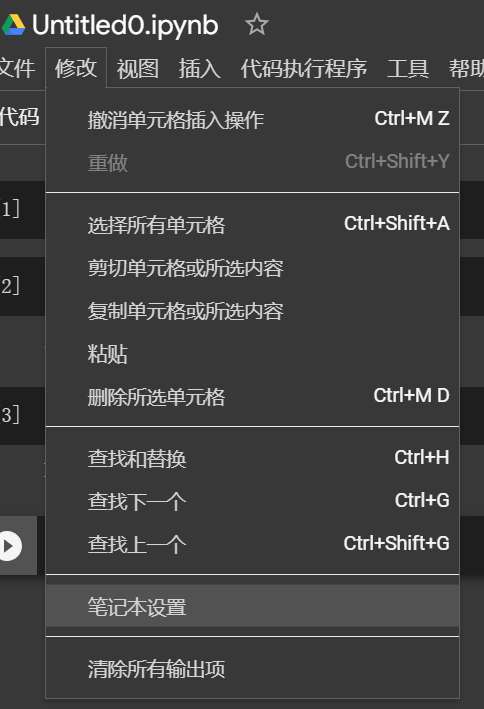
Goole Colaboratory
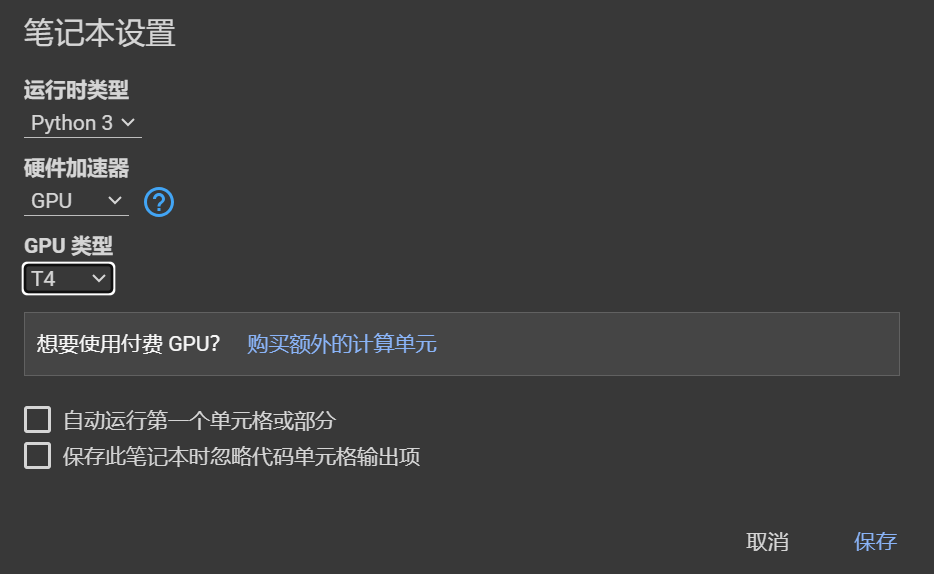
打开GPU
![image-20230722165519327](https://cdn.jsdelivr.net/gh/techniquenotes/photohouse@main/Pytorch/Learning%20note/Day3/202307222024730.png)
![image-20230722165546244](https://cdn.jsdelivr.net/gh/techniquenotes/photohouse@main/Pytorch/Learning%20note/Day3/202307222024908.png)
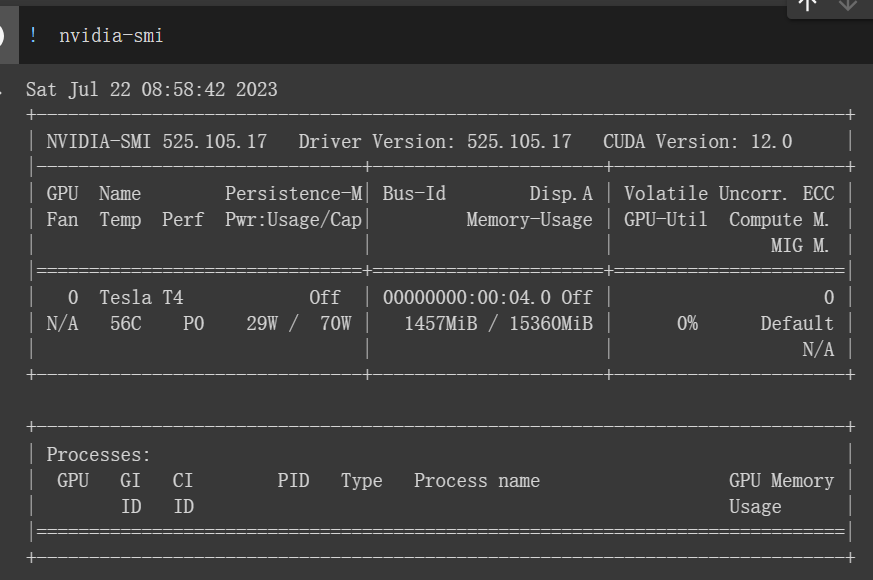
代码前加!表示不用python语法,用终端语法
![image-20230722165905600](https://cdn.jsdelivr.net/gh/techniquenotes/photohouse@main/Pytorch/Learning%20note/Day3/202307222024633.png)
![image-20230722165935223](https://cdn.jsdelivr.net/gh/techniquenotes/photohouse@main/Pytorch/Learning%20note/Day3/202307222024827.png)
28 利用GPU训练(二)
![image-20230722170622579](https://cdn.jsdelivr.net/gh/techniquenotes/photohouse@main/Pytorch/Learning%20note/Day3/202307222024381.png)
1 |
|
device写法
1 |
|
29 完整模型验证
1 |
|
30 阅读开源项目
1 |
|
requered=True表明一定需要这个参数
可以把其改成default,就可以在pycharm中右键运行
1 |
|